Showing posts with label automotive. Show all posts

Wednesday, April 26, 2023

Installing a modern stereo in the old Miata for Apple CarPlay

Hey! Long time no post! Yes, I'm still here - alive and kicking, and the Miata sometimes gets a little attention. Nowadays it's garaged 600 miles away from my main digs and I only get to see it a few months of the year, but when I am with it, the magic is still there. I actually drive it more miles per year than I did for the last five years before I got it painted and fixed it up.

Anyhoo, when I'm at our place in Florida, I get really bored and need things to do, because...well, just because. So last year I decided I would update the technology stack inside the Miata from 1990 tech to 2022 tech. In our other car, we have Apple CarPlay from the factory and we do use it quite a bit for navigation and streaming music and podcasts. So I figured that'd be a nice upgrade for the Miata, even though I never take it on long trips. I still need navigation around town sometimes and well... see above - I was bored. So the pictures here in this blog post show what I did. It's a Pioneer DMH-W2770NEX. It is pretty no-frills, actually. It just has basic stereo receiver, bluetooth, and wireless CarPlay functions (Android Auto, too but I don't use that).

As I am a terrible documentarian, these photos are a bit jumbled and not very well conceived. BUT they do sort of show what I did so let's just go with it. I was able to use the factory stereo bracket to mount this unit. That was just luck. So I didn't need any sort of adapter

As you can see, the NA Miata's stereo mount opening is not really double-din. It's a bit taller so there's a gap under the stereo unit. The following pics show how I dealt with that. For transparency, I didn't dream this up on my own. I found a YouTube video and just copied what they did.

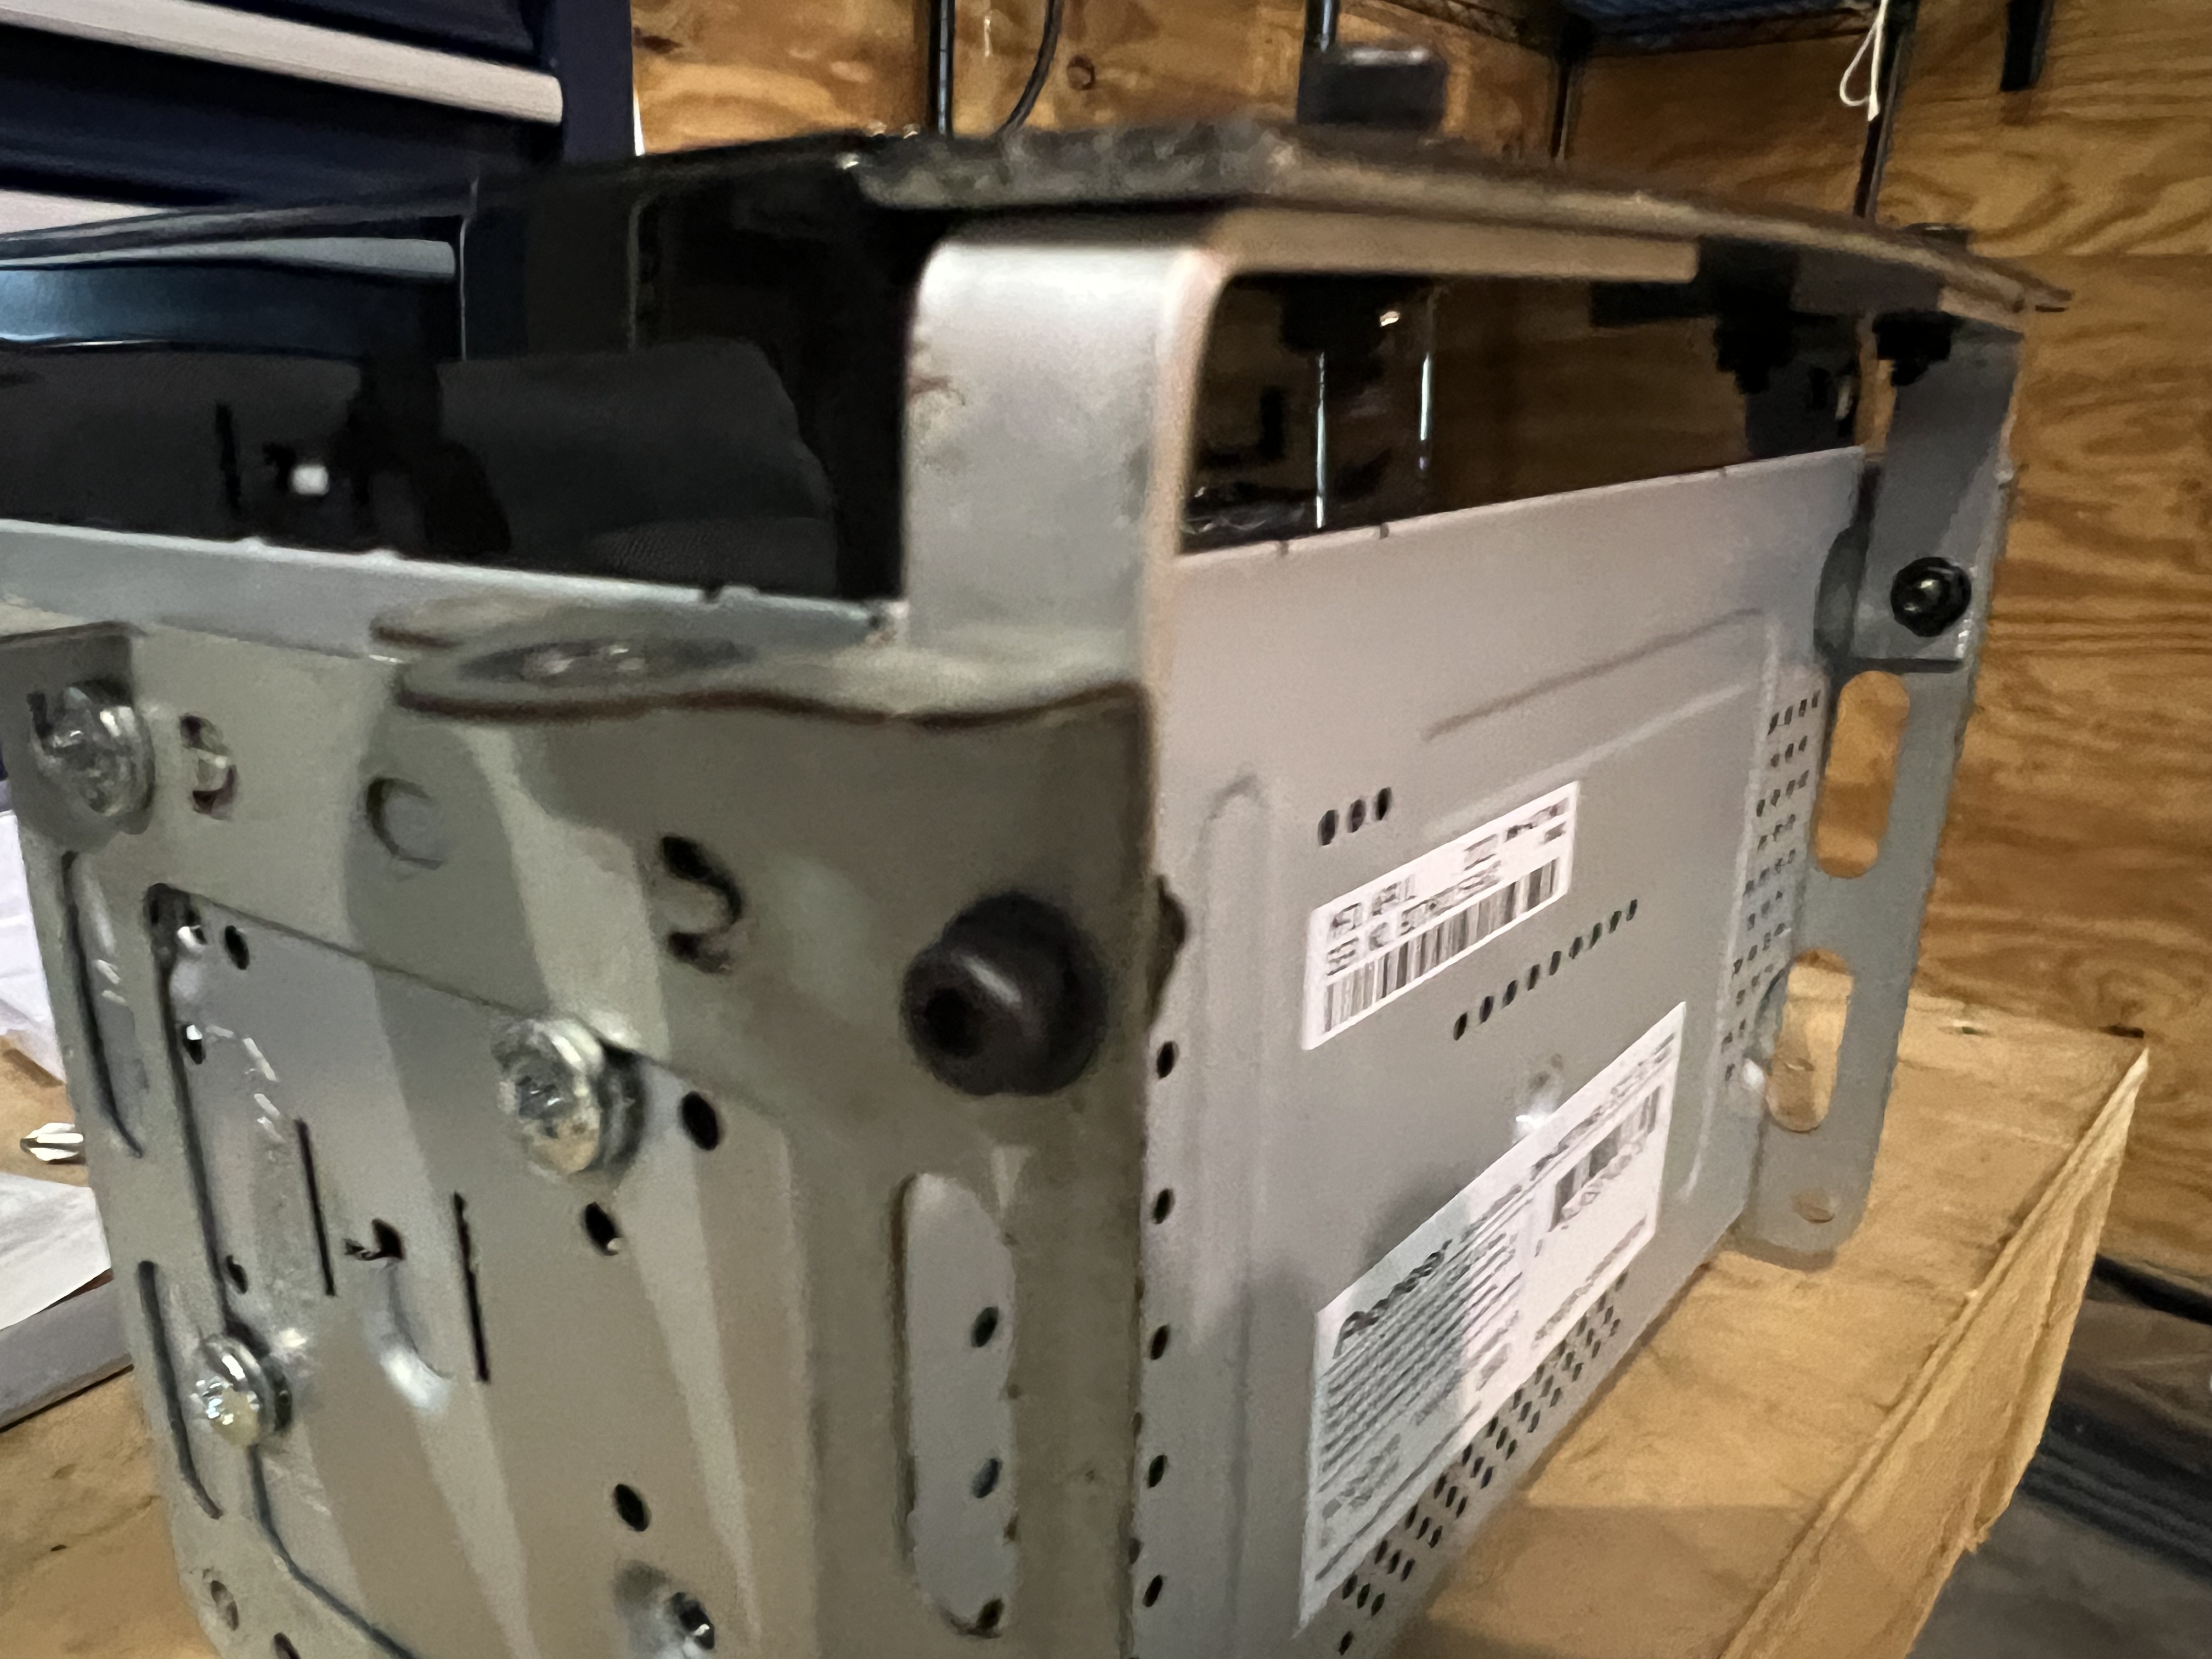
I fashioned some little brackets from aluminum stock to attach to the factory bracket, and a faceplate filler from some bigger stock Plasti-dipped for color. I bought some small cap head screws with washers and bolts to hold it all together and there you go. You can see how the factory bracket isn't really a perfect fit for this stereo, but I was able to get one bolt in a good hole, and two others were a little off but overlapped the bracket just enough to get a hold on it. It's actually quite solid and I'm really glad I didn't have use some stupid adapter kit.

Above, another pretty good view of the three machine screws holding the unit to the factory bracket.

The cap head machine screws with a washer actually look pretty factory. I like it when things don't look too janky. I mean a little janky is ok, but not TOO janky.

Hey, here you can see the Coco mats.

Yeah... it's a little janky.

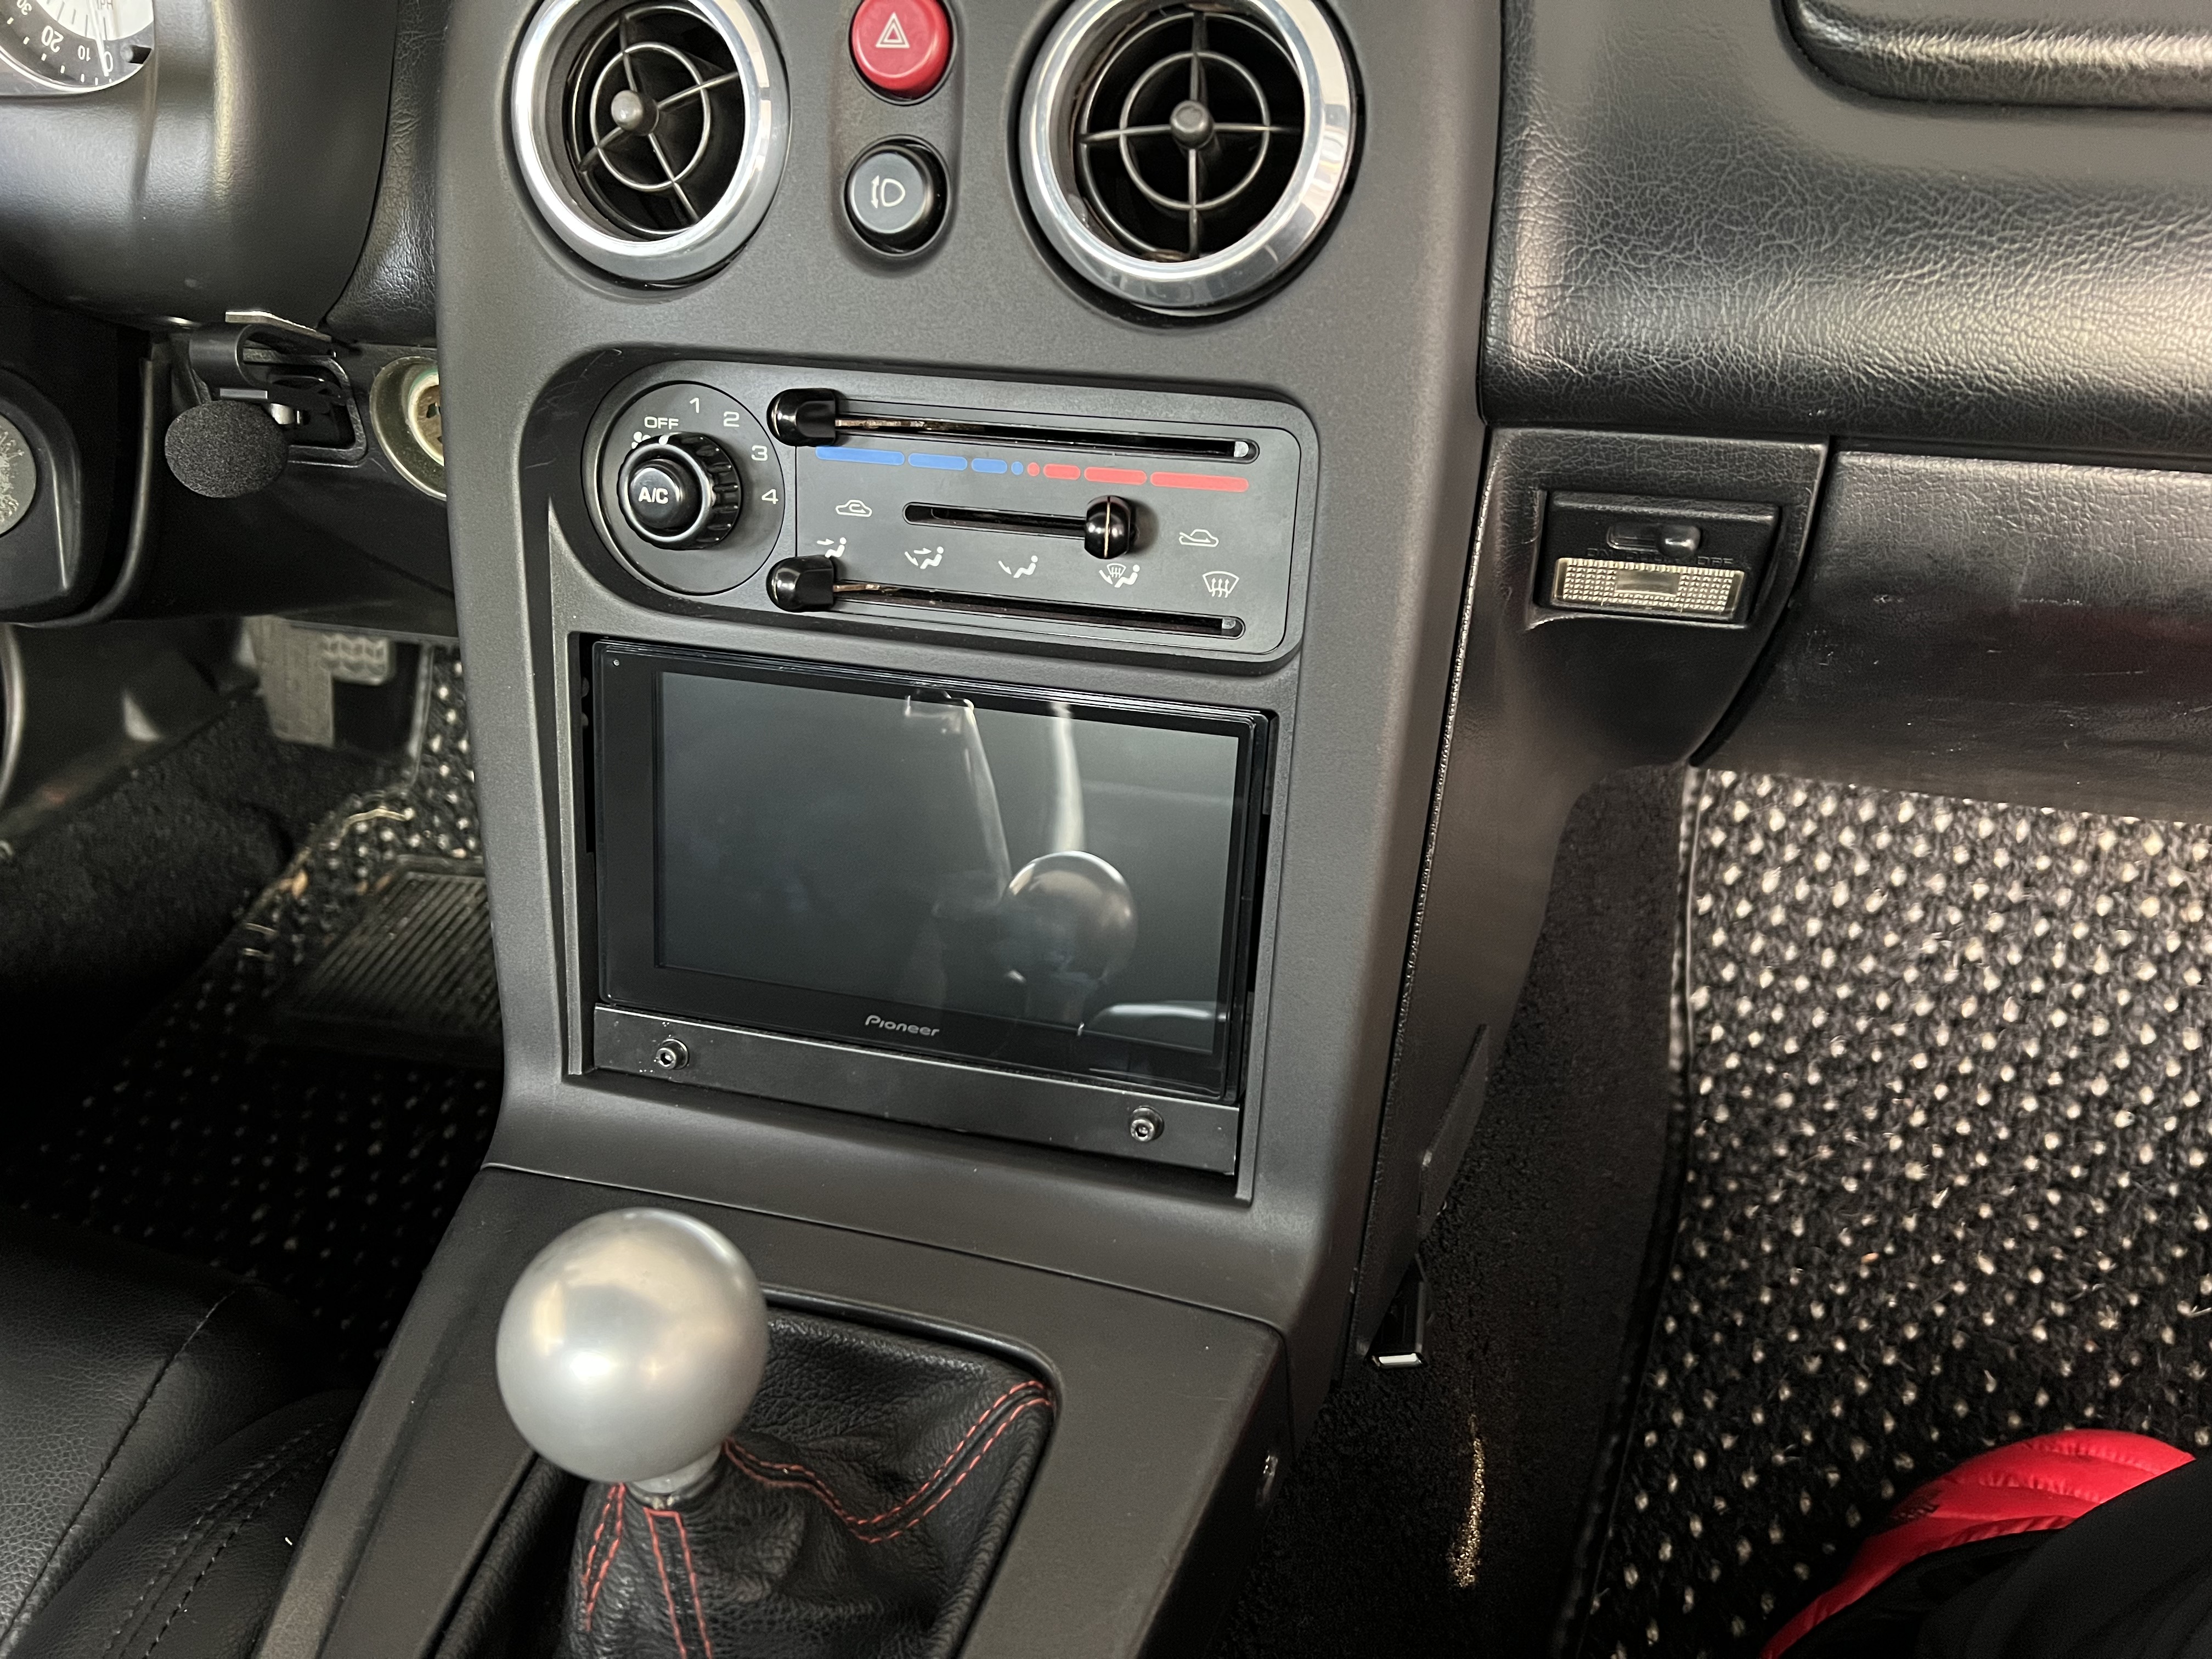
It's not perfect and I marred the plasti-dip finish a little when installing it, but it's perfectly acceptable.

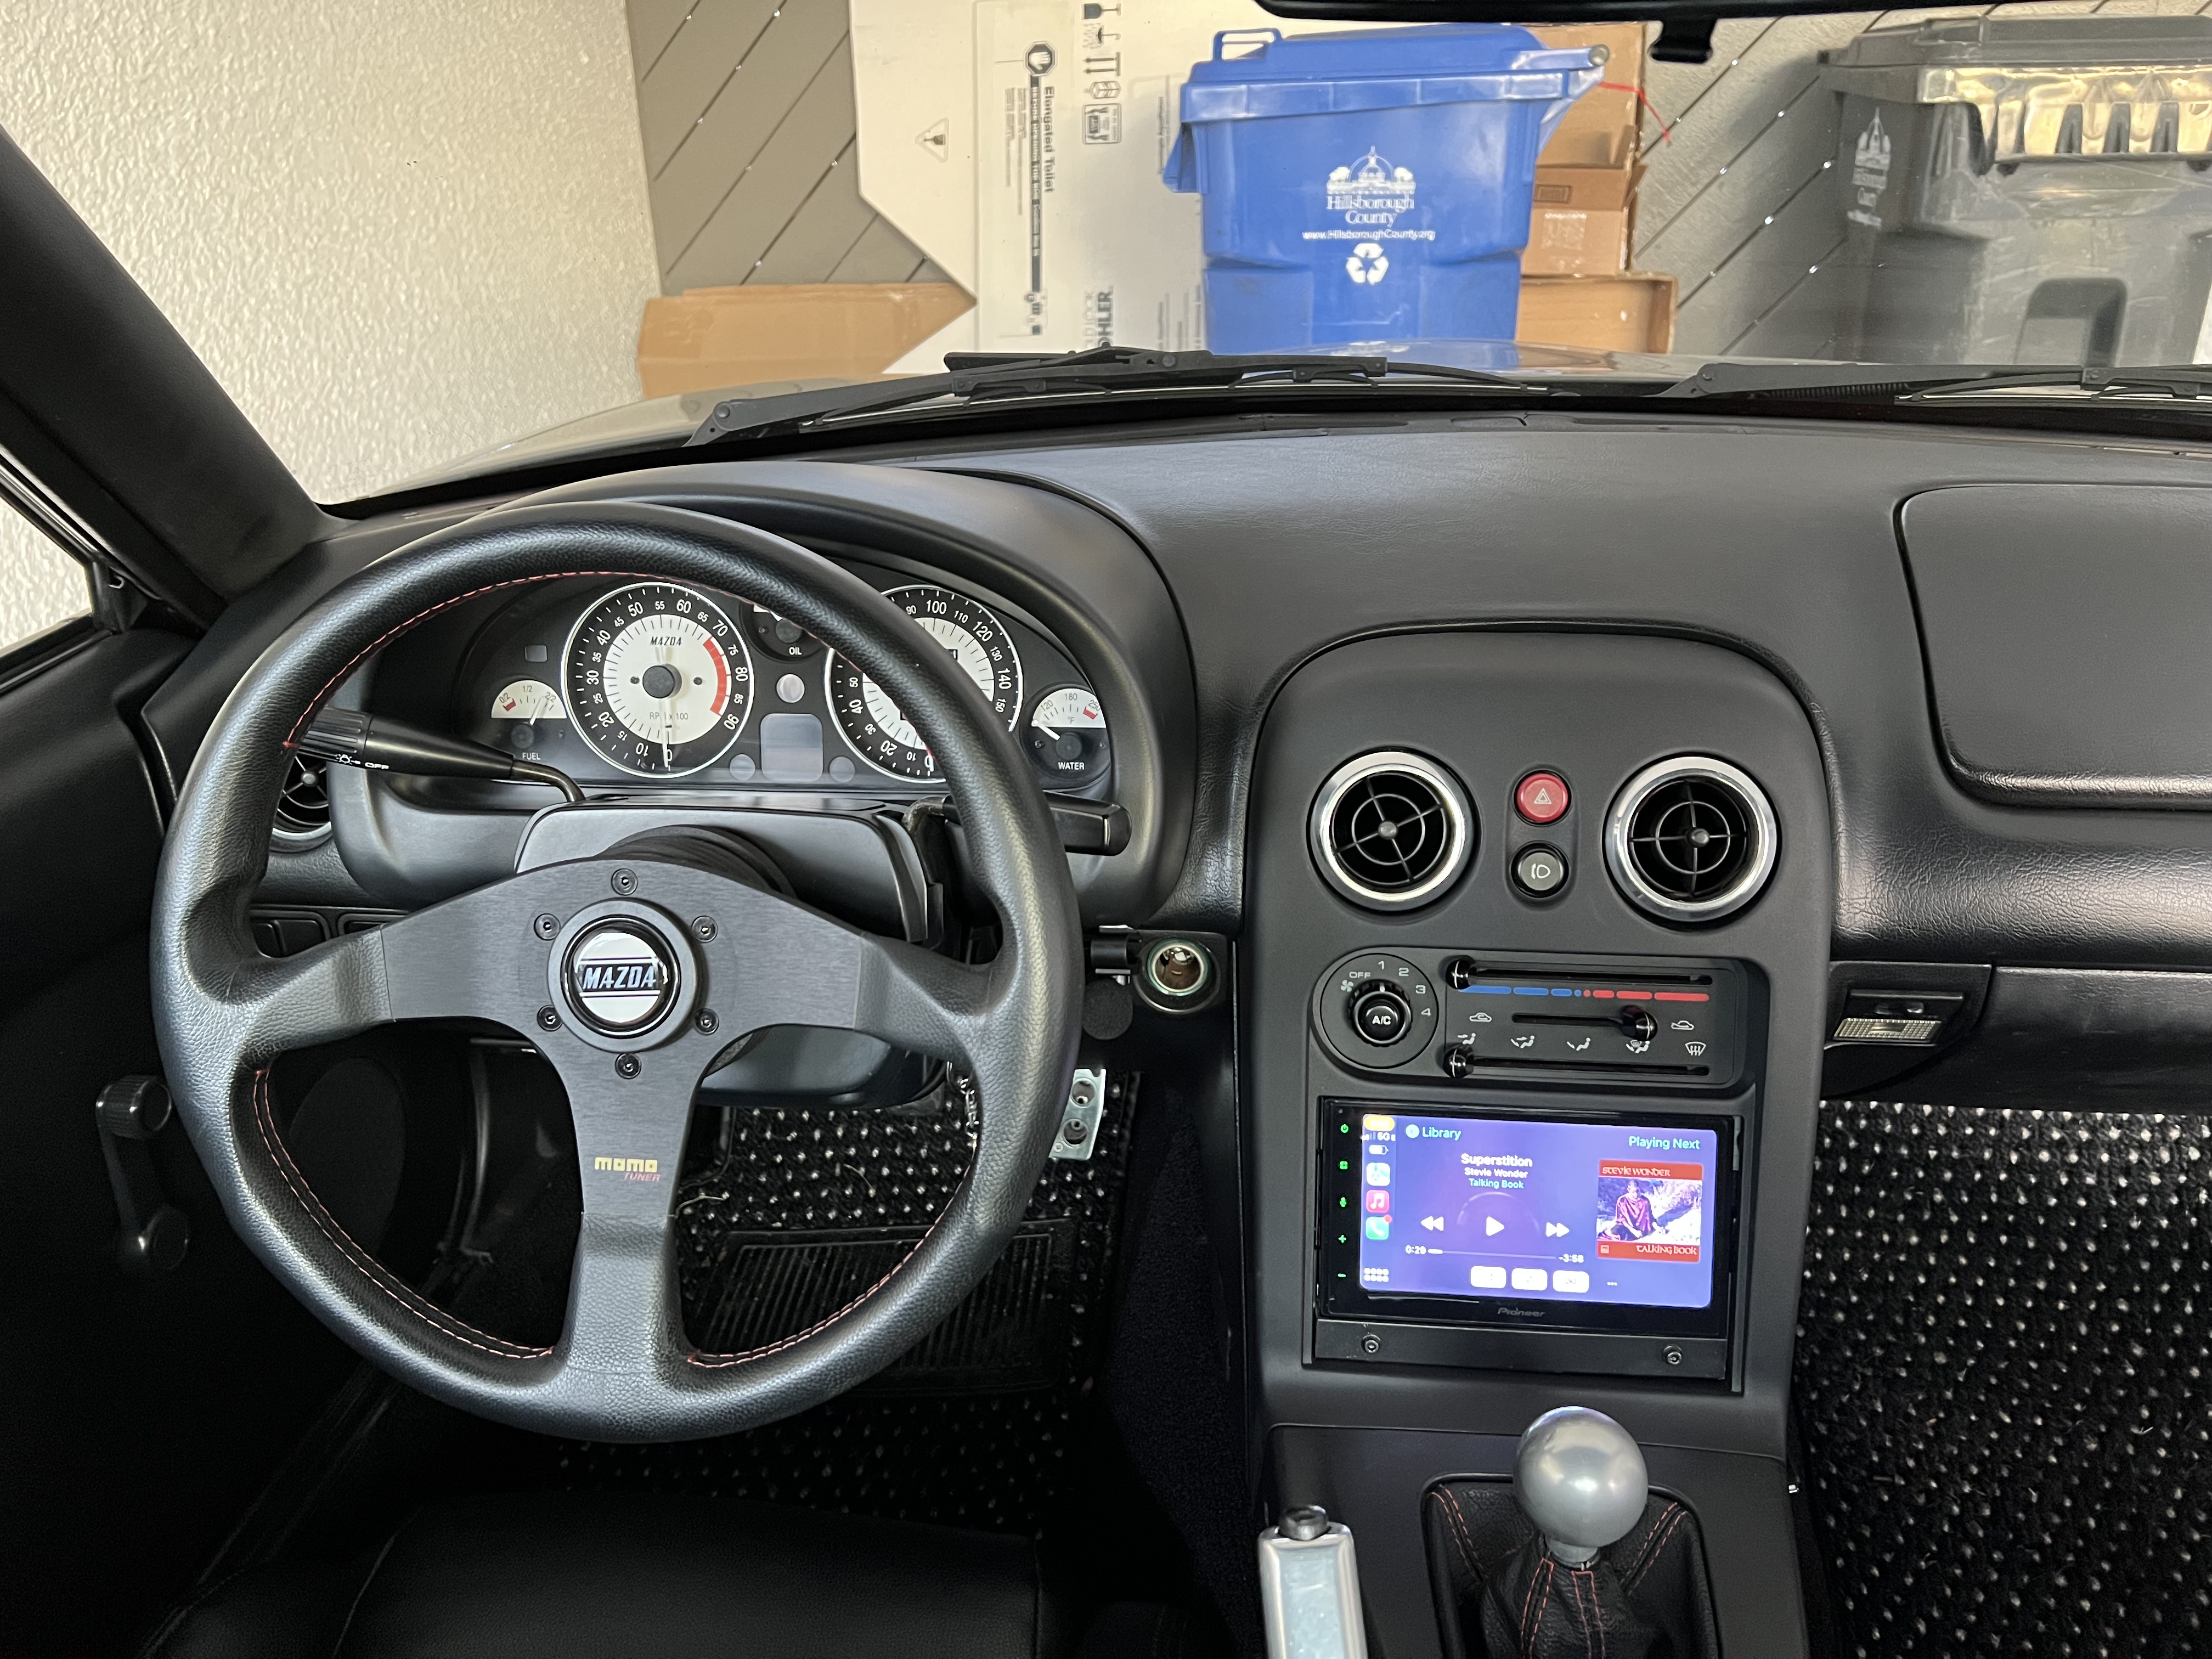
It pretty much looks like it belongs there, so I'm happy.

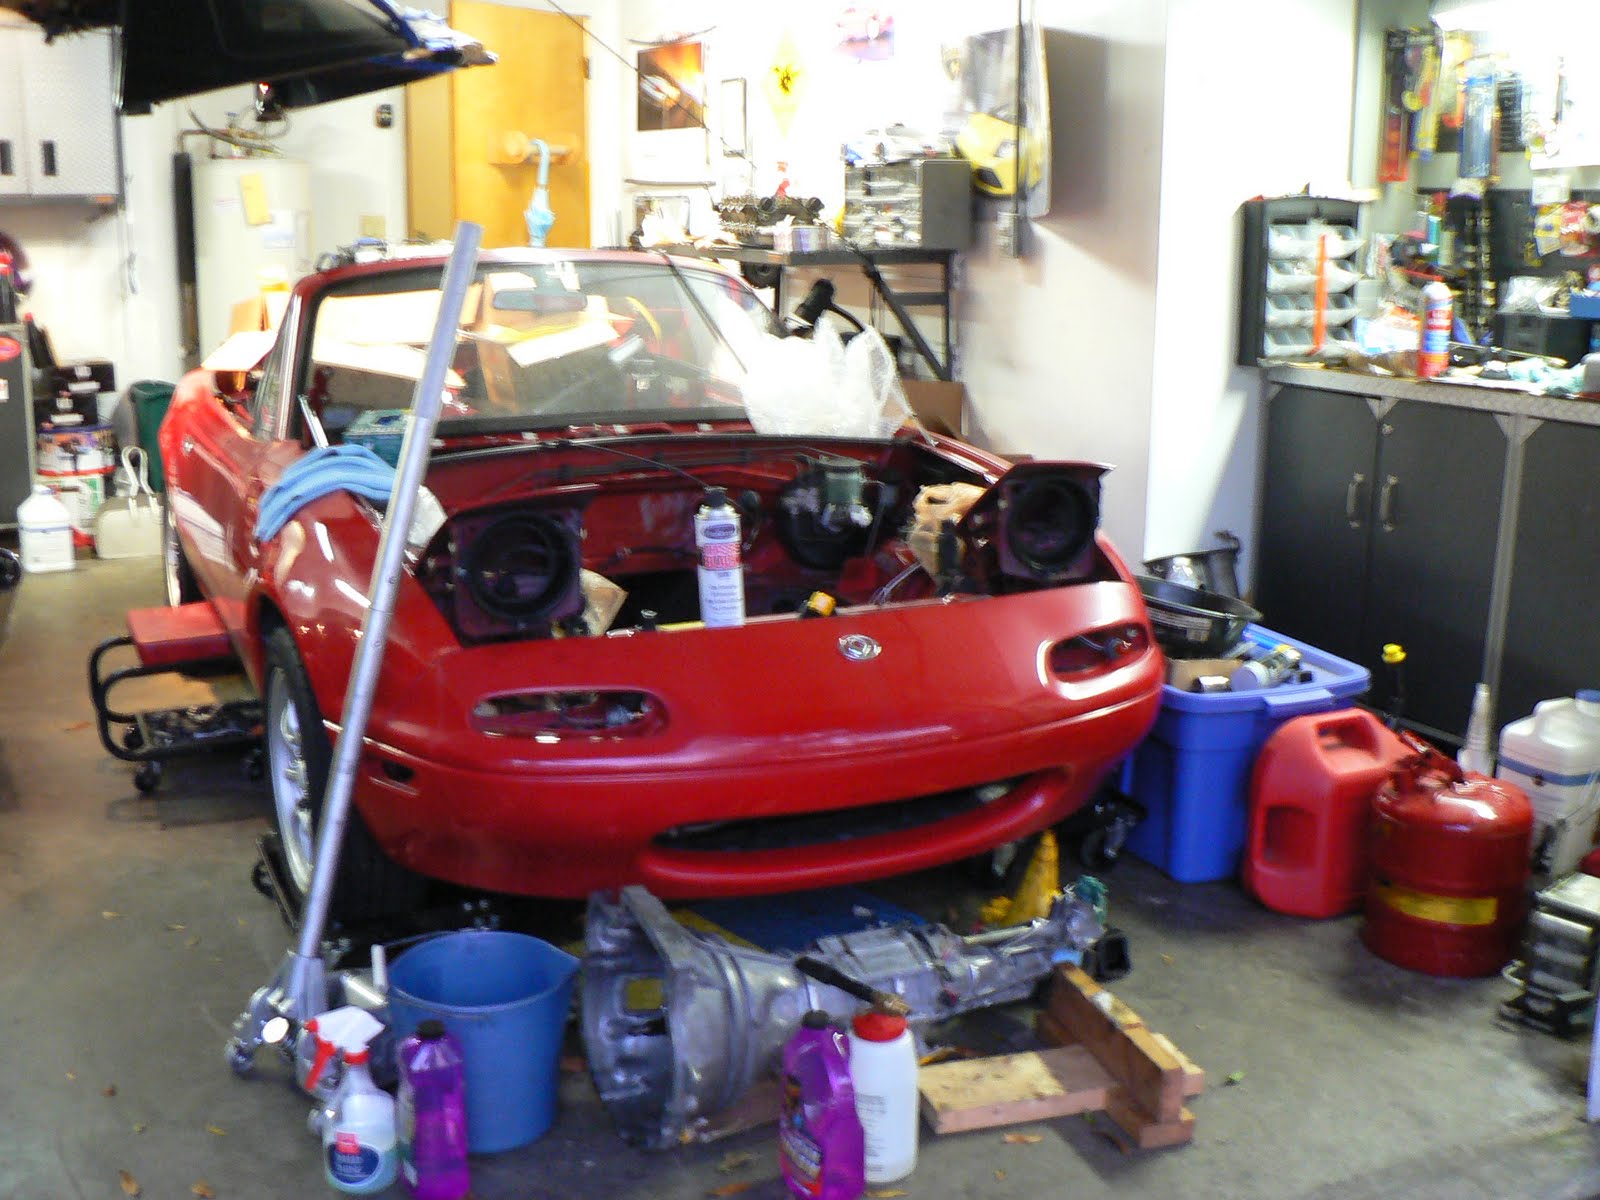
Once this was in, I thought it sometimes sounded fine, and other times sounded pretty bad, so I opted to replace the 25 year old Pioneer door speakers with some slightly larger (6.5 inch) Kenwood speakers. It improved the sound a bit, but it's still pretty sad. I've found that when streaming audio from Apple Music to this unit, sometimes it sounds really crappy! If I'm playing songs stored directly on my phone it's quite a bit better. So I'm not sure why but it seems like sometimes the streaming quality drops. My phone is a current model iPhone so maybe it's the wireless CarPlay connection. I'll try it wired and see if it makes a difference, but in any case, I think this stereo would benefit greatly from an amp and maybe a small sub. It's not a big priority for me since I don't really need to listen to music in this car, but maybe the next time I'm bored and need something to do I'll address it.

Monday, March 27, 2017

2006 Cayman S Water Pump and Thermostat Change

So my Cayman has 43,000 miles on it and it's 11 years old. Normally I wouldn't be worried about a water pump at this point but I keep reading the experts on the internet saying you should replace the water pump every 40k miles. I think this is *incredibly* conservative but given the cost of repairs to an M97 engine, I'm ok with erring on the side of caution. So I decided to go ahead and replace the water pump and thermostat. Once I got into the job, I thought the coolant hoses looked a little old so I replaced those, too - or at least the ones in the rear of the car that supply coolant to the big aluminum pipes that go up to the radiators in the front, and to the heater core.

Pierburg water pump from Pelican Parts. They are an OEM supplier, so this pump is exactly the same as the original. The impeller is composite plastic, which is what you want.
It came with a new gasket, which was not clear from the Pelican Parts catalog, so I bought a separate one too. To remove the pump, take off the cover under the front of the engine, drain the cooling system and remove the hoses that are in the way. I planned to replace all the hoses so just cut them off to make removal easier. I didn't want to risk damage to the aluminum coolant tubes so I gently slit each hose for easier removal. After 11 years they were stuck pretty hard. The water pump is held on with six small bolts, with 10mm hex heads. They are very easy to remove. The thermostat is held on with four E10 external torx bolts. A couple of them are pretty tricky to get to so have a variety of extensions and a swivel on hand. Only one of the water pump bolts was hard to get to.

I'd rate the difficulty level of replacing the Cayman's water pump and thermostat as a 3, where my Miata is an 8 and my E46 M3 was a 7. The hardest part is getting all the covers off!

Top cover off. The only reason to remove this cover for this job is when you fill the cooling system you need to open the bleed valve. The front cover behind the seats needs to come off too, to make access to the water pump easier. You can probably do it all from below, but much easier with access from the front as well.
I took a photo of the belt routing to ease reinstallation of the belt. I actually bought a new belt but opted not to replace it yet because this one looked fine. The tensioner pulley is the one directly above the crank pulley, with the 24mm hex head. Wrench that clockwise to release the belt tension.
Ok, so here's a thing I learned. The Porsche branded antifreeze is ridiculously expensive. Normally I would just suck it up and pay the money, but this rubbed me the wrong way. There's just no way the Porsche stuff is that special. So, I did a bunch of searching, finding references in the forums about what the Porsche antifreeze really is, and the specs it meets. I crossed referenced those specs with products I could find for sale with published spec sheets, and I believe this stuff pictured here is essentially identical to the Porsche coolant. It's still more than good old Prestone, but half the cost of Porsche. It's made in Germany, it's pink, and it's available on Amazon.
Here's the old water pump with 43 thousand miles on it. I was a bit premature replacing it. There was no play in the bearing. Would have lasted quite a bit longer.
Another slightly tricky thing with the Cayman (and the Boxster as well), is getting it up on four jackstands. When I had the 986 Boxster S, I was able to do it without anything special, but it wasn't fun. For the Cayman I decided to make things a little easier on myself. To that end I bought Lift Bars and they definitely make lifting the Cayman safer and simpler. The bars just plug into the factory lift points and you can jack one whole side of the car at a time. Your jackstands go under the liftbars. The lift bars are hand made to order, and well worth the cost for the added peace of mind and safety.
Sorry for my lousy photo of the liftbars. Just visit their website and it shows them much more clearly.

Finally, the hardest part of this project was filling the cooling system. I drained about 4 gallons of coolant out, so there was some still in there, but not a whole lot. I used distilled water in a 1:1 ratio with the Pentofrost E coolant. I found a write-up on how to fill the system here and it worked well. It just takes a lot of repeated burping and topping up. A week after I changed the water pump I put 1100 miles on the car and it performed flawlessly!

Here's another pic for grins.

Saturday, September 12, 2015

Assembling the Miata Engine Short Block - part 3 of a series

This the third post in a series. Part One, and Part Two came before this one. Here's part 4 which came after this one.
 
In this post I'll briefly go over the assembly of the engine short block. I'm not going to quote torque values here. Look those up for yourself. It's important you verify that yourself. I took the block, crank, rods and pistons to 3D Service in Tampa, Florida. I had them overbore the cylinders 0.5mm, resurface the block, clean it, install new freeze plugs, check and polish the crank, and check the rods. This all came to $500. I had bought a set of DNJ brand 2001-2005 pistons in 83.5mm (that's 0.5 bigger than stock to account for the overbore) from Rockauto because of the higher compression ratio (10:1) compared to my 1994's original 9:1 ratio. I supplied the pistons to the machine shop so they could properly clearance them when they did the overbore. Even at 10:1 compression this is still a non-interference engine.
 
So now it was time to assemble everything. I started with the rods and pistons. These are fairly easy to assemble. I was wishing for a better set of snap-ring pliers but I managed to get them together. Assembly is made easier by either getting the wrist pin cold, or making the piston hot. I think the hot method is better because the cold method resulted in condensation forming on the pin, which made it slightly wet. I used plenty of assembly lube and gently tapped the pin into place, and then snapped-in the snap rings. MAKE SURE YOU INSTALL BOTH SNAP RINGS! I almost left one out which would have cost me the engine.
 
Once all the pistons were assembled to the rods, I moved on to the rings.
The rings are clearly labeled as to which rings they are, and also to which way is up.
You have to space out the end-gaps so they don't line up. My shop manual spelled out exactly how to space them. This photo shows only the oil control rings assembled. Note that the spacer ring has an up-down direction, but the oil control rings don't. The first and second compression rings are not identical and also have an up and a down. Don't mess this up! I used a pair of ring pliers to get the compression rings in place. They're quite stiff so it would be hard to get them on with your fingers. The oil control rings are easy and you won't need the pliers for them.
Do not buy this tool to compress your rings, or if you did, deposit it directly in the trash. I deposited two of them in the trash before I learned my lesson.
Meanwhile, I installed the main bearing top halves and gently laid the crank in place, then torqued down the bearing caps (with the bearing halves installed, of course, and plenty of assembly lube). Don't forget the thrust washers on the number 4 journal. The crank spins freely in the block at this point.
This is the hardest part of the build - getting the pistons in the bores. The cheap ring compressors flat didn't work so I bought a better tool, which worked but was still really hard to use. This photo shows three pistons in place. Took me about an hour to get to this point. The first oil control ring likes to sneak out from under the compressor and hang up on the rim of the cylinder just as you are tapping the piston in. Like, 90 percent of the time. Note that there is a front and back to the pistons. These DNJ pistons have a round mark on the top indicating the front of the engine. There is a cut-out area of the skirt to clear the oil squirter in the block. If you install the piston backwards it will collide with the squirter.
This is the tool that actually works. Mind you, the oil control ring still hangs up 9 times out of 10, but it eventually works and you don't get your hands all sliced up and your block scratched. I got this one on Amazon and it's a GearWrench brand tool. It comes in a nice case and has a variety of rings for many different bore sizes. I'll probably never use it again, but I have it.
I found that if it kept hanging up on the rim of the cylinder if I reoriented the tool on the piston sometimes it would go in. You have to be careful not to mess up the spacing of your ring gaps while wrestling with this. I probably did. I gently tapped each piston into place with a wooden handle. Once the oil control rings get past the rim, the whole thing goes in easier. If you feel increased resistance, STOP. If you force it you will bend a ring and score the cylinder wall. Keep everything coated and lubricated with oil while doing this.
When you're tapping the pistons in, make sure to put some tape over the end of the rod bolts, so they won't scratch the crank journals. I fount it best to rotate the crank so each rod journal was at its lowest point before I installed the rod.
Finally I installed the rod bearing caps, again with plenty of assembly lube. With the pistons connected to the crank it doesn't spin quite as easily but you should still be able to move it by hand. If you can't, something is wrong.

Wednesday, July 16, 2014

Quick Update

I'm sorry for the lack of new posts for the last year or so. I hope to get back to actively blogging in the next few months. It's just that I've been devoting most of my time to my house and property for the last year. It's been long overdue, and we're getting a bit closer to the end of the major projects. I wish I could say one of the projects was a big new garage, but I don't have the room for that, and other things became more important. I still have Gorilla Garage Tampa, though, where I have plenty of room for my workshop.

I will give a quick update on each of my project cars.

  • 2004 BMW M3: has been pretty bullet proof, but has 127,000 miles on it now and I feel the need for some pre-emptive maintenance. I plan to go ahead and replace the radiator, water pump, and a couple of hoses that I have not already replaced once. Then it needs new shocks as it still rides on the originals. I have a fuel filter waiting to go in it, and the brakes need to be bled. I'll install a new/reconditioned steering wheel as the leather on the original one is getting worn, and the B and C pillars have some of the cloth lining peeling off, so I'll replace those with new. All of that adds up to a couple thousand dollars, but this BMW has been pretty easy on me so far, so I'll treat it right and get what it needs to be 100%.
  • 1994 Mazda Miata: as always, my reliable daily driver. It's been over 2 years since my major reconditioning of it, and I've hardly done so much as wash it. It would benefit from new shocks as the Tein suspension is now 10 years old, and it needs brake pads all around. It's still a joy to drive and looks pretty decent considering my amateur painting skills.
  • 1992 Jeep Cherokee: As primitive and unrefined as it is, I love this vehicle. I've been using it for almost 2 years as a utility vehicle and occasionally driving it to work. Other than the initial tune-up I did on it and a little cosmetic restoration, I've not done much to it. The brake lines still need replacing, the shocks are still dead, the tires are hard as rocks, the driver window is still balky going up and down, the A/C still (despite my best efforts) does not work. I have replaced the entire A/C system, with the exception of the evaporator, and it still isn't cooling. So I have a new evaporator ready to go in, just waiting for a free weekend to pull the dashboard out and install it. If that doesn't work I give up. I plan to install new shocks and maybe a minimal lift kit, get new tires, and get the thing painted. If the A/C works, it'll be a decent vehicle. If it doesn't, I'll probably end up selling it.

I also hope for the garage at the house itself to be a project in the next year or so. It just needs some cleaning up, paint, and I'd like to put down a new floor. I don't expect we'll be in this house for more than 5 years or so, but I also know how 5 years can suddenly turn into 10, so I need to keep it together.

Monday, April 29, 2013

Gorilla Garage

So it's been a long time since I've posted. Life has been busy and I've not had a lot of time to do car stuff, and even less to write blog posts. Nevertheless, there is news afoot in Morrison's Garage. We've moved into an actual garage; namely, Gorilla Garage Tampa. Formerly the site of the Gorilla Theatre (the name kinda stuck) and housed within the walls of a nondescript warehouse in the strip-club and industrial warehouse district of Tampa, the GGT is almost 3000 square feet of space, shared between myself and three other gearhead enthusiasts.
 
Panorama of the GGT showing a couple of the other residents' projects.

My M3 in for a rear brake job.

It's nice working with a TON of space. I'm still working on getting my work area set up and sorting out which tools stay at the house and which go to GGT.
A pic from up in the loft. My neighbor is a '61 Austin-Healey 3000 that is in show-winning condition. I think my cheap Jeep and Miata will feel a little inferior.

My plans for the GGT include finishing the Cheap Jeep and possibly getting it ready to sell, sprucing up the BMW a bit and bringing it up to A+ condition, and maybe another engine project for the Miata. I'd also like to purchase and restore an older BMW or Porsche. More to come...

Friday, October 21, 2011

Motor done

Ok, I'm declaring the motor DONE. I got the oil pan reinstalled today. The front and rear gaskets cost me $4.50. They go on the curved portions of the pan under the crank. The rest of the pan is just sealed with RTV. I let the RTV cure and then refilled the engine with oil to see if anything leaked. It didn't.
I still have to mount the alternator and the other pulleys and get the right PCV valve but that's trivial. The lower and middle timing belt covers are new. The old ones were a bit chewed up by the water pump pulley rubbing on them. The top cover was kind of expensive so I opted to clean up the old one. Surprisingly, brake fluid makes an *excellent* plastic cleaner and conditioner. I used it liberally on the cover and it came out looking really good.
Here's the back. Note the blue tape on one of the coil plugs and a blue dot on the back of the coil pack. The harness connectors will plug into either coil so the blue dot is a clue. Too bad it's impossible to see it if the coil pack is installed in the car! I put a piece of tape over the dot when I painted the bracket to preserve it for the next time.
Here's the current state of the car. Now that the motor is done things should start moving along more quickly. Hopefully it will be interesting.

Sunday, October 02, 2011

Miata engine refurb stuff

So this weekend I got into re-doing the engine. I got the block cleaned up and painted, the pistons cleaned, the '99 head disassembled and cleaned, and the intake manifold cleaned, painted and reassembled. Note that I'm using the term refurb and not rebuild. I did a compression test before I took everything apart and it had 170 psi across the board, so even though this engine has 155,000 miles on it I'm going to leave it alone for now. If it needs a rebuild later I'll take that opportunity to put higher compression pistons in.
After degreasing and pressure washing I used painter's tape to mask off the deck, oil pump body, and all the exposed machined surfaces. Then I just sprayed the block with red engine enamel. It turned out nice!
Here's the '99 cylinder head with the cams off and the lifters out. My next step was to use my valve spring compressor to remove the valves. See my earlier blog post where I posted a video on how to remove the valves. I used a plastic storage organizer with 16 compartments in it to keep each valve together with its tappet, shim, spring, retainer, and keepers. I want them to go back in the same hole they came out of.
Here's the bottom two-thirds of the intake manifold. This is a great view of the butterflies that make up the VICS system. These butterflies are closed by default but open (or I may have that backwards) at a certain RPM (on '99 and '00 models) to a resonance chamber. The chamber is a dead-end so the path the air takes doesn't actually change when the system engages. This won't work at all on my '94 unless I rig up an RPM switch and a solenoid to engage the actuator. Even without VICS hooked up the '99 head makes more power than the '94 head, so it's a good swap either way.
Here's the '99 intake manifold fully assembled and the '94 throttle body installed. I found the water connections on my idle air control valve are quite corroded so I may devise a way to just bypass it. I painted the manifold with Aluma-Blast from Eastwood and it looks fantastic. The throttle body is too complicated and intricate to spray so I polished it up as well as I could with a soft brass wire wheel on my right-angle die grinder.
The '99 head came with a pretty fresh cam cover so I degreased it and painted it with Aluma-Blast.

Here's a few more photos from this weekend.

Here's one of the solid lifters with the shim attached. I pulled out all 16 lifters and measured the shims. One lifter was missing its shim entirely. I had to make a best-guess as to what size shim would work best in the spot, so I just ordered a couple that were close in size to all the other shims on the intake cam. The ones available from Mazda were mostly not close in size to the shims I have so it may be tricky to get everything in spec. I can't go any farther with the head until I get that shim but it should be here by next weekend.