Sunday, October 08, 2017

Sunday, June 25, 2017

I Have a Confession to Make - 94 Miata Paint

I have this thing that's eating away at me. It's been happening for about a year now. I don't advertise it although it's not a secret; but it's time I do something about it.

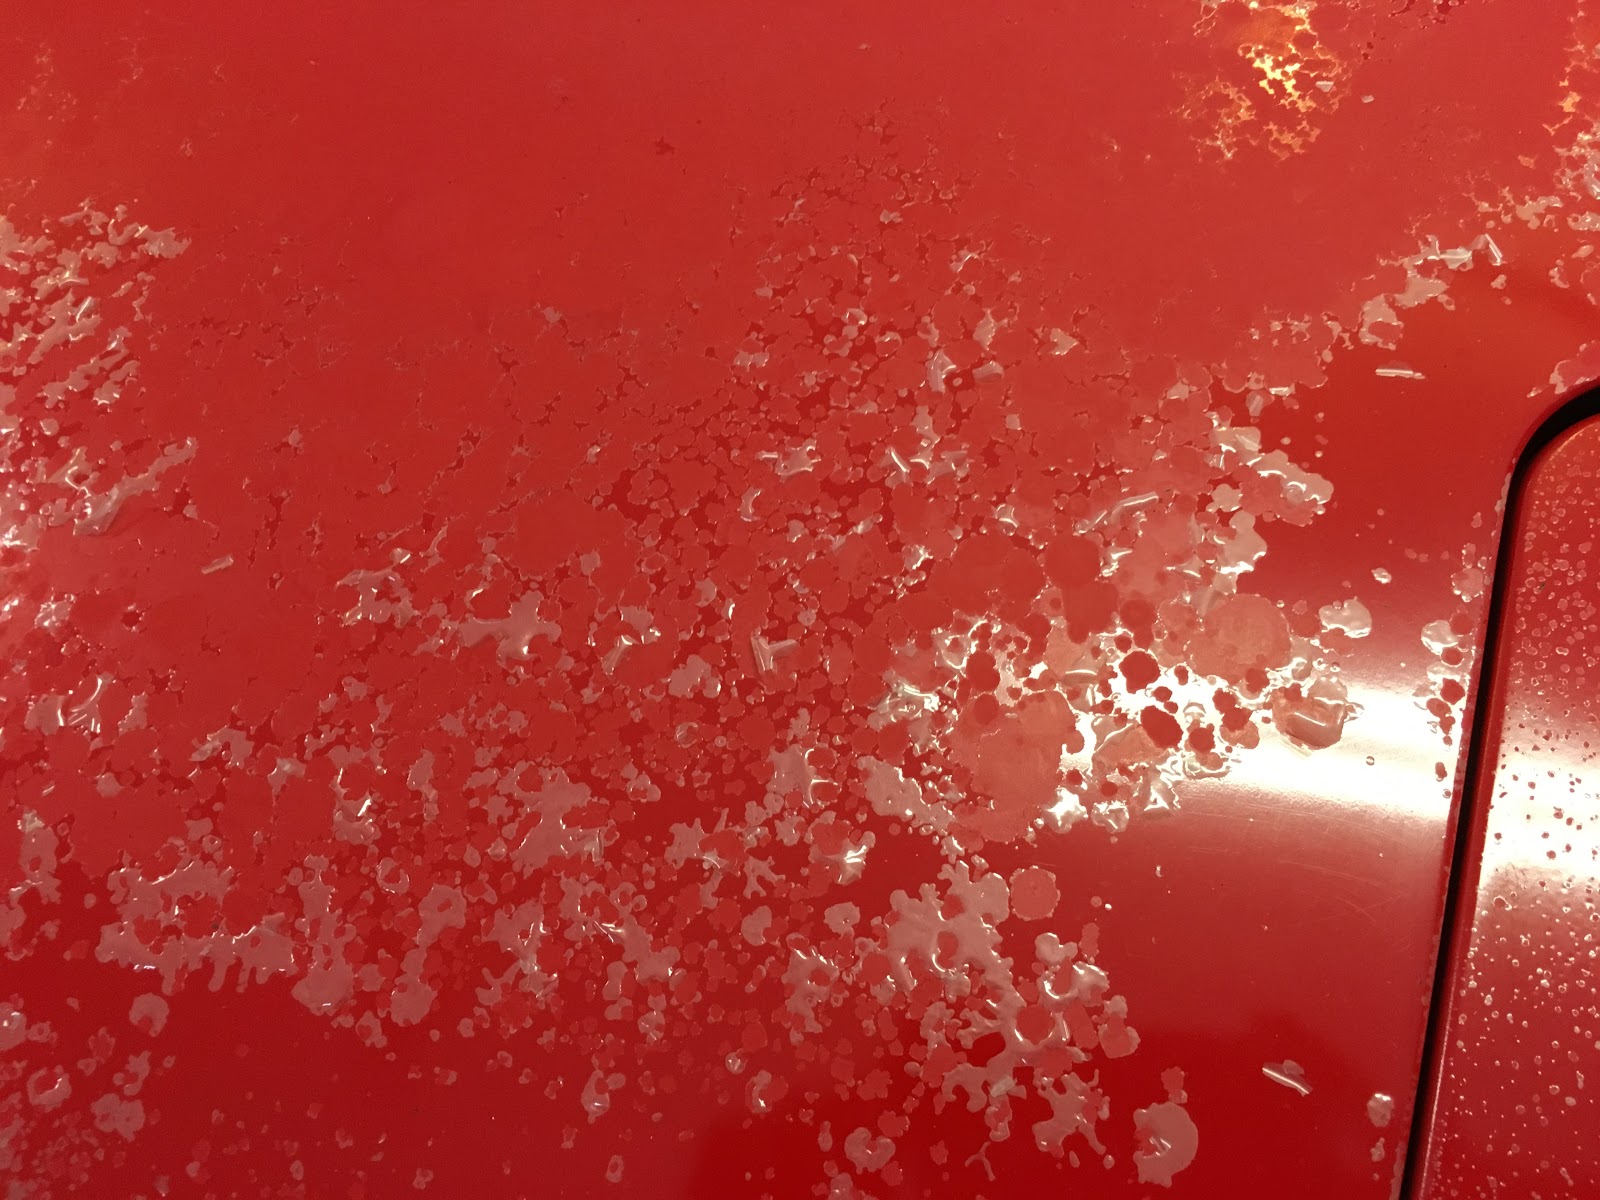
The paint on my '94 Miata has failed. The clear coat just fell off. If you look back in this blog to the end of 2011 you'll see I did this paint job myself in my garage. It turned out ok. Not great but ok. For the $500 I spent on it, it was fine. I started to see the first indications of a problem in late 2015, just as we moved from Tampa to Knoxville. There was a single small bubble in the clear coat on the hood. It was the size of a pin head but I knew what it meant. Once in Knoxville, the car had to be parked outside. The damage unfolded quickly from there. By spring of 2016 the car still looked ok from 10 feet away, but the de-lamination of the clear coat was progressing apace. By the spring of 2017 the destruction was pretty much complete. So, my DIY budget paint job lasted between 4 and 5 years. I'm fine with that. I didn't take care of the paint and I didn't expect it to last forever. It was a stopgap measure from the start.

So, a paint job is forthcoming. I will not be doing it myself. I also have a place to store the car indoors now, so once this is fixed the issue should not come back.

Large areas of the clear coat are completely gone. I've been encouraging it to come off by pressure-washing every few weeks to remove loose paint. I figure the more I can get off, the less work the paint shop will have to do.
While I'm at it, I'm going to install this RSpeed officially-licensed Garage Vary style trunk spoiler.

Here I've just stuck it on with some painter's tape so I could see what it looked like. I also have some small fender flares from Rev9. I don't have a photo of those so you'll have to wait until they're painted and installed. I'm still debating on color. I'd like to restore the car to the original color, but at the same time I'd also like to do something different. Tough life decisions...

More soon...

Friday, June 16, 2017

Recovering 1994 Miata Seats

As usual, I failed to take a logical progression of photos during this job, but I did get a few and will include them here. It should give a flavor of what's involved in recovering the Miata seats. I've had slip-on covers on the original seats for several years now but was never happy with how they fit. So, real upholstery was called for. I bought these covers on Amazon for under $150. For that price, even if they don't hold up, I'm not out much. Except for about 8 hours of labor, of course.

The hardest part of the whole operation is getting the old covers off the foam cushions. There are a ton of hog rings that you have to cut. My pair of dykes was barely up to the task. It takes a ton of hand strength to cut them. If you do this job, do yourself a favor and get a nice new pair of really big dykes. By the end of the second seat, my hands were worn out and my dykes were dull so I could barely cut the rings anymore. I ended up cutting a bunch of them with a Dremel tool.
The seat back is in two major pieces. Pay attention to how they come apart so you'll know how they go back together. It's not entirely obvious. The center piece is held in by the upholstery itself.
There. That sort of shows it.
The old foam is in really sad shape, but new foam was not in the cards. It's either unavailable or really expensive. I used gorilla tape and some polyester batting to shore up the side bolsters.
The other problem with the foam is that there are metal rods on either side of the main center seat cushion that were pulling out of the foam. These rods are what the hog rings loop around and give the seat its upholstered shape. I fixed it using some 16-gauge aluminum wire...
...pushed through the foam over the rod...
...and secured on the underside with a wooden dowel (chopstick). This gives the new hog rings something to pull against, rather than just rip out of the foam.
The seat pans were also really rusty. Some Rustoleum gray primer fixed them right up.
Fully restored seat pan. I also cleaned and lubed the sliders.
Wrapping the underside of the seat-back is a bit tricky. Lots of stretching required. I did a lot better on the second one than the first.
Finished product. I'm pretty happy with how these turned out.
No doubt the vinyl will be quite hot in the heat of the summer, but it's worth it for seats that aren't absolutely gross. This project breathed a lot of new life into this car.

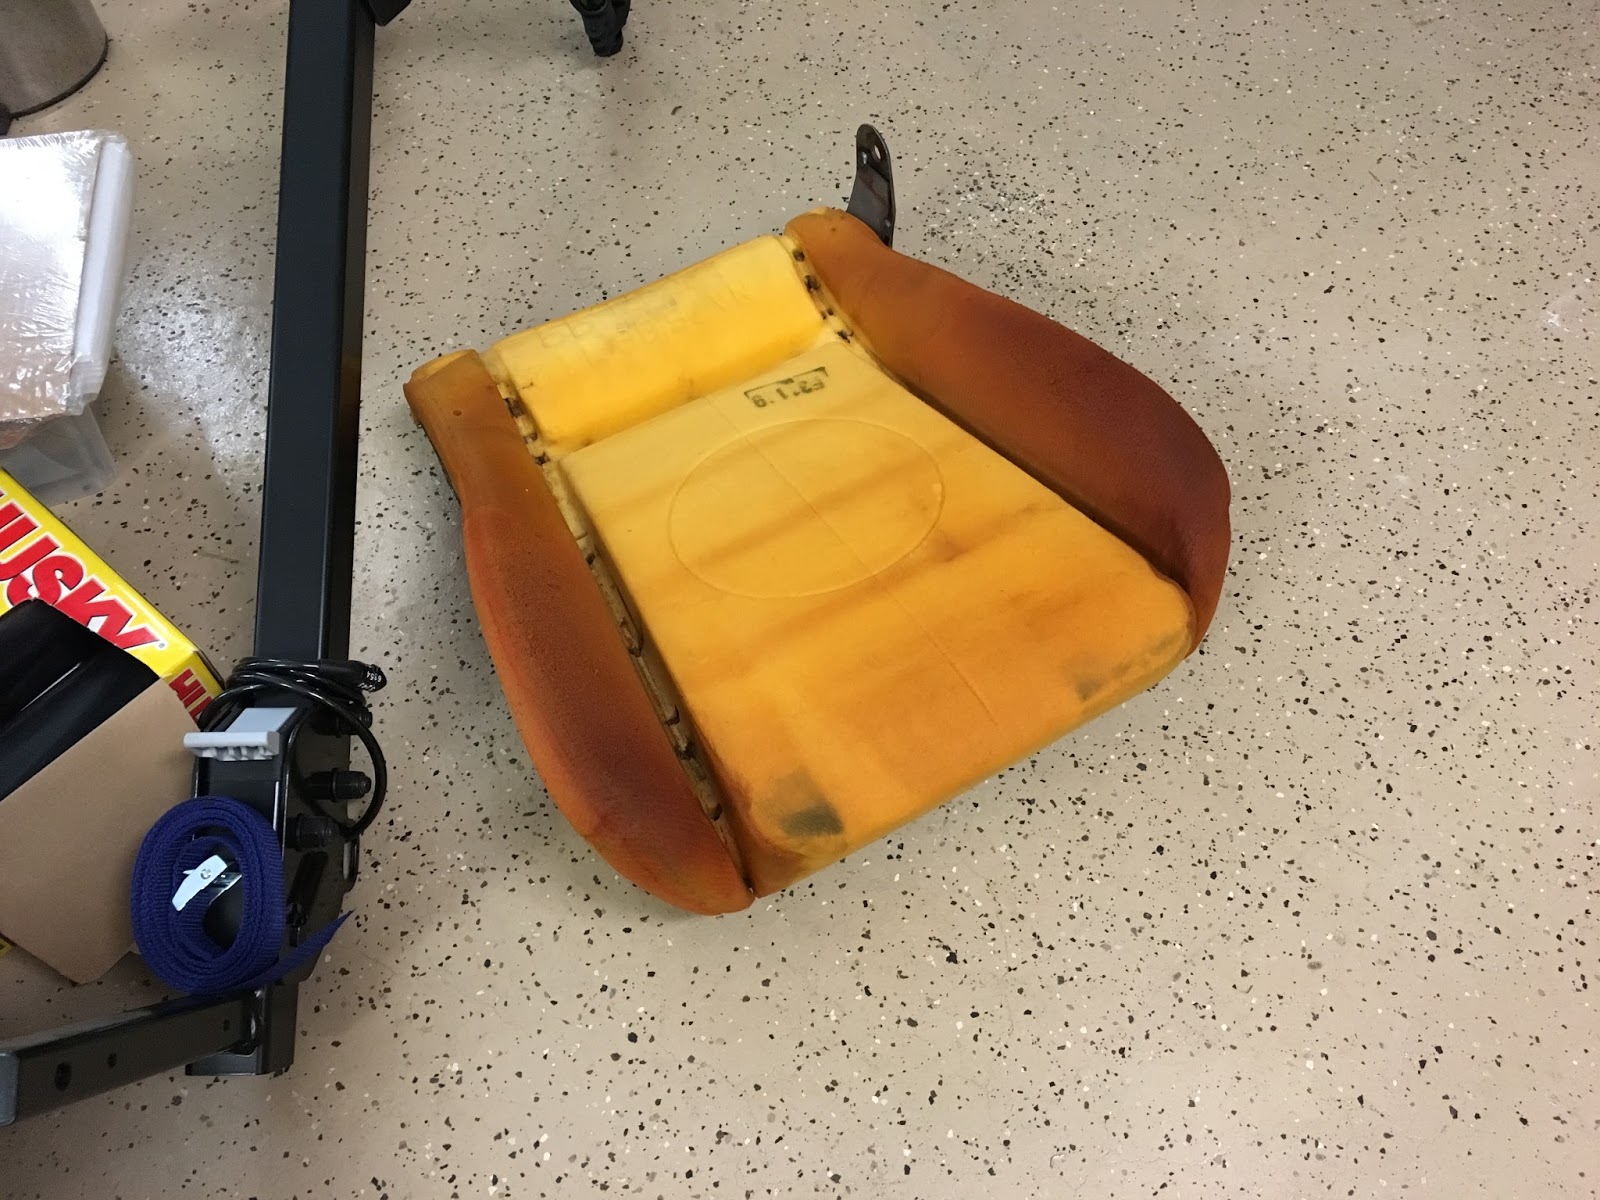
One final note - I used a lot of zip ties instead of hog rings. In many cases, it was a lot easier to get a zip tie in place. In some cases the hog ring worked better, though, so be prepared to use both.

Thursday, June 08, 2017

1994 Miata Original Radio Goodness

Still working on getting the interior in order, I did a little work on the center stack. I had previously hacked up the 'tombstone' to install a double-din stereo out of a 2002 Protege. It fit but I had to widen the opening just a bit. After that stereo died I put the original stereo back in, but after 15 years I had lost the cubby hole and the hacked up plastic looked pretty bad. So, I installed a brand-new 'tombstone' and a blank panel under the radio where the cubby was.
The part number for this blank panel is NA01-55-231. Now that I have the fancy gauge faces (previous post) I feel like the A/C controls need a little help. Gotta think about that.

Tuesday, May 02, 2017

Revlimiter Gauge Face Install in '94 Miata

So I'm doing some work on the Miata! I've had this Miata for almost 20 years now, and the last year and a half since we moved to Tennessee has been really hard on it. It's been parked outdoors 24/7/365 and for a 24 year old car, that's brutal. I've got some parts and upgrades ordered and it will be getting a complete paint job here pretty soon. I'm also going to find a way to park it indoors. To kick things off, though, I decided to do something I've always wanted to do but never got around to it. I've long been a fan of the bespoke handmade gauge faces made by Adam at Revlimiter.net. His designs are pure genius and the workmanship is top notch. The best part is he doesn't charge an arm and a leg. So a few months ago I ordered a set of his faces, and they proceeded to sit on the shelf for six months or so before I got a chance to install them. This is pretty typical for me, by the way. I have a set of Flyin Miata frame rail braces that I bought in 2012 that I have yet to install. I swear, I'm getting to it.

Anyway, as usual I'm not going to tell you how to install anything. Revlimiter has outstanding instructions on the website. Instead I'll just post some photos and make some comments.

Just for reference, here's the old gauge faces just before I took them off.
I just thought this was interesting. In 20 years of Miata ownership I've never seen these parts. I think they're wonderfully analog!
New faces in place.
Getting the needles lined up right. The only tricky one was the water temp gauge. It just wanted to read too low no matter what I did. I finally got it to point straight up when the engine is warm. That's close enough for this inaccurate gauge. Ditto the OPG. The numbers don't mean much. I checked the speedo against GPS and it's within about 2 mph at 40 mph. The tach seems to read too high unless I set it too low at idle. I don't care.
The finished product.
Here's how they look at night.
This is a meaningless yet strangely satisfying modification. I think it bodes well for where I'm going with this car. More to come.

Wednesday, April 26, 2017

Classic Motorsports "The Mitty" at Road Atlanta 2017

Last weekend we took a trip down to Road Atlanta for The Mitty. This year's featured marque was Porsche and since we are now proud Porsche owners it seemed fitting to participate. We stayed at the lovely Chateau Elan Winery and Resort - or more accurately, we stayed at the new Hampton Inn and Suites on the Chateau property. Much more affordable and we could still easily enjoy all the amenities of the resort. I'd write more about it but this is an automotive blog.

I shot almost 1000 photos on the weekend but since most of the track is surrounded by catch fencing, it was really hard to get unobstructed photos of cars on track. I did my best, though, and here are some halfway decent photos.

Here's part of the Porsche corral. This only shows a fraction of the cars. It was really cool parking with all the other Porsches. No other marque had anywhere near the showing the P-cars did.
Flyin' Miata brought their stuff all the way from Colorado. This is the Mazda MX-5 RF with a lovely set of bronze 6UL wheels and a lowered suspension (don't know the details). This car is quite striking in person. There were many MX-5s in attendance.
I just love the patina on this old truck. Had to snap a pic.
A great looking 944.
Back in the mid-late 90's I had a racing game on my PC called Sportscar GT. It was the greatest racing game I'd ever seen up to that time and I spent hundreds of hours playing it. This car was in it, and it was always one of my favorites. I also remember seeing this car at many races back in the day. Seeing it in person again after all these years was really neat.
Awesome Brumos-liveried 987 Cayman.
I got lucky and got a shot of this Gulf liveried 911 through an access hole in the catch fence.
A line of Porsches heading down into the Esses.
The Ford GT40 is possibly the greatest sportscar of all time. It's a 50 year old design and still makes your blood boil when you look at it. So amazing to see on track. There were several in attendance and as you'll see I love taking photos of them.
This one pulled off track with an issue. Getting the sister car in the background was a complete accident. These sorts of accidents are why I love photography.
And here we are on track during the touring laps. Photo by Double Vision Photography. These were the fastest touring laps I've ever done. We expected to slowly drive around the track for one or two laps but instead it was 4 laps driving at least five-tenths. Jen had never been on a track before and seemed to really enjoy it. Great fun.

Friday, April 07, 2017

Wheel spacers for the Cayman S

The Cayman looked a little narrow-wheeled to me. Maybe because it's lowered, but the wheels just seemed to sit a little too far inboard from the fender lips. A common mod for Caymans is wheel spacers. 7mm front and 15mm rear is a common fitment and what I chose. Some go more extreme but my car is lowered and not running a ton of camber so I played it safe. I ordered mine from GMP Performance and got them in about a week.
This shows the car after the spacers were installed. The rear wheel sits pretty flush with the fender but there doesn't appear to be any rubbing or interference.
Here's another shot from the front. You can see the new black wheel bolts a little bit. I really like the look. The original zinc plated bolts were looking a bit ratty. It's little things like that which make a car feel special. Also note I've added the Cayman R style side stripe. As side stripes are a long tradition with Porsches, I think these are perfect and appropriate.
The spacers came with longer wheel bolts, in black, and I needed new ones anyway. The spacer just slips over the hub flange and is held on by the small screws that secure the rotor to the hub. Don't do this without fitting longer bolts.
I've already put about 1200 miles on the car and there's been no rubbing or interference. The wider track makes the car feel a little more planted at speed. I think this is a good mod.

Monday, March 27, 2017

2006 Cayman S Water Pump and Thermostat Change

So my Cayman has 43,000 miles on it and it's 11 years old. Normally I wouldn't be worried about a water pump at this point but I keep reading the experts on the internet saying you should replace the water pump every 40k miles. I think this is *incredibly* conservative but given the cost of repairs to an M97 engine, I'm ok with erring on the side of caution. So I decided to go ahead and replace the water pump and thermostat. Once I got into the job, I thought the coolant hoses looked a little old so I replaced those, too - or at least the ones in the rear of the car that supply coolant to the big aluminum pipes that go up to the radiators in the front, and to the heater core.

Pierburg water pump from Pelican Parts. They are an OEM supplier, so this pump is exactly the same as the original. The impeller is composite plastic, which is what you want.
It came with a new gasket, which was not clear from the Pelican Parts catalog, so I bought a separate one too. To remove the pump, take off the cover under the front of the engine, drain the cooling system and remove the hoses that are in the way. I planned to replace all the hoses so just cut them off to make removal easier. I didn't want to risk damage to the aluminum coolant tubes so I gently slit each hose for easier removal. After 11 years they were stuck pretty hard. The water pump is held on with six small bolts, with 10mm hex heads. They are very easy to remove. The thermostat is held on with four E10 external torx bolts. A couple of them are pretty tricky to get to so have a variety of extensions and a swivel on hand. Only one of the water pump bolts was hard to get to.

I'd rate the difficulty level of replacing the Cayman's water pump and thermostat as a 3, where my Miata is an 8 and my E46 M3 was a 7. The hardest part is getting all the covers off!

Top cover off. The only reason to remove this cover for this job is when you fill the cooling system you need to open the bleed valve. The front cover behind the seats needs to come off too, to make access to the water pump easier. You can probably do it all from below, but much easier with access from the front as well.
I took a photo of the belt routing to ease reinstallation of the belt. I actually bought a new belt but opted not to replace it yet because this one looked fine. The tensioner pulley is the one directly above the crank pulley, with the 24mm hex head. Wrench that clockwise to release the belt tension.
Ok, so here's a thing I learned. The Porsche branded antifreeze is ridiculously expensive. Normally I would just suck it up and pay the money, but this rubbed me the wrong way. There's just no way the Porsche stuff is that special. So, I did a bunch of searching, finding references in the forums about what the Porsche antifreeze really is, and the specs it meets. I crossed referenced those specs with products I could find for sale with published spec sheets, and I believe this stuff pictured here is essentially identical to the Porsche coolant. It's still more than good old Prestone, but half the cost of Porsche. It's made in Germany, it's pink, and it's available on Amazon.
Here's the old water pump with 43 thousand miles on it. I was a bit premature replacing it. There was no play in the bearing. Would have lasted quite a bit longer.
Another slightly tricky thing with the Cayman (and the Boxster as well), is getting it up on four jackstands. When I had the 986 Boxster S, I was able to do it without anything special, but it wasn't fun. For the Cayman I decided to make things a little easier on myself. To that end I bought Lift Bars and they definitely make lifting the Cayman safer and simpler. The bars just plug into the factory lift points and you can jack one whole side of the car at a time. Your jackstands go under the liftbars. The lift bars are hand made to order, and well worth the cost for the added peace of mind and safety.
Sorry for my lousy photo of the liftbars. Just visit their website and it shows them much more clearly.

Finally, the hardest part of this project was filling the cooling system. I drained about 4 gallons of coolant out, so there was some still in there, but not a whole lot. I used distilled water in a 1:1 ratio with the Pentofrost E coolant. I found a write-up on how to fill the system here and it worked well. It just takes a lot of repeated burping and topping up. A week after I changed the water pump I put 1100 miles on the car and it performed flawlessly!

Here's another pic for grins.