Showing posts with label repainting. Show all posts

Tuesday, April 14, 2020

Miata Spoiler

I picked up this Garage Vary licensed spoiler from RSpeed three years ago, just waiting for this project to happen. I still had the original R-package spoiler that came with the car, but the styling of that piece looks a little dated to me, so I decided to try this style. If you're familiar with the R-package spoiler, you'll know that this spoiler has a bit more aggressive angle to it, and is slightly shorter. I was really on the fence about even using this spoiler. I like the car without any spoiler, but I had it painted so felt it worth the effort to install it just so I can live with it for a while to see if I like it enough to keep it. It took two tries to get it installed. My first attempt went on a little crooked and the double-sided tape didn't make good contact all around. I was able to yank it back off and apply new tape, and on the second attempt I managed to set it in the right place. Now removing it will involve fishing line and lots of goo-gone.
Here you can also see the shiny, brand-new factory Mazda tail lights I bought from Priority Mazda.
UPDATE: September 2020 - it has taken me three attempts to get this thing to stay on. The double-sided tape it came with didn't make enough contact with the trunk lid to stay stuck. I added a second, thicker layer of tape and it also didn't stay stuck. My third attempt involved adding short pieces of tape at very strategic locations, on top of the original tape, so that there would be enough thickness of tape to actually touch the body panel. The problem is the bottom surface of the spoiler is slightly concave, and the tape just doesn't protrude enough. This third attempt seems good, but it's only been one day. If it comes loose again I'm chucking it in the trash.

Thursday, March 12, 2020

Destroyer Grey Miata

Here she is, just as I got her home from the paint shop. Lots of reassembly to do but I’m absolutely thrilled with how the paint turned out.
The color is a Dodge color called Destroyer Grey but it’s really a classic nonmetallic grey similar to some used as far back as the 1960’s. It reminds me of Porsche Slate Grey although side by side that color would look a bit different.
They even fixed the hood alignment.
I have a bunch of new parts to install and some old ones to reuse. I sprung for new taillights to replace the originals that are now 27 years old and getting pretty hazy. I have a bunch of new moldings, cowl panel, interior carpet, Raydot style side mirrors, rear spoiler, and will be refinishing the original front air dam and rear skirt.

Saturday, February 29, 2020

Finally some progress to report

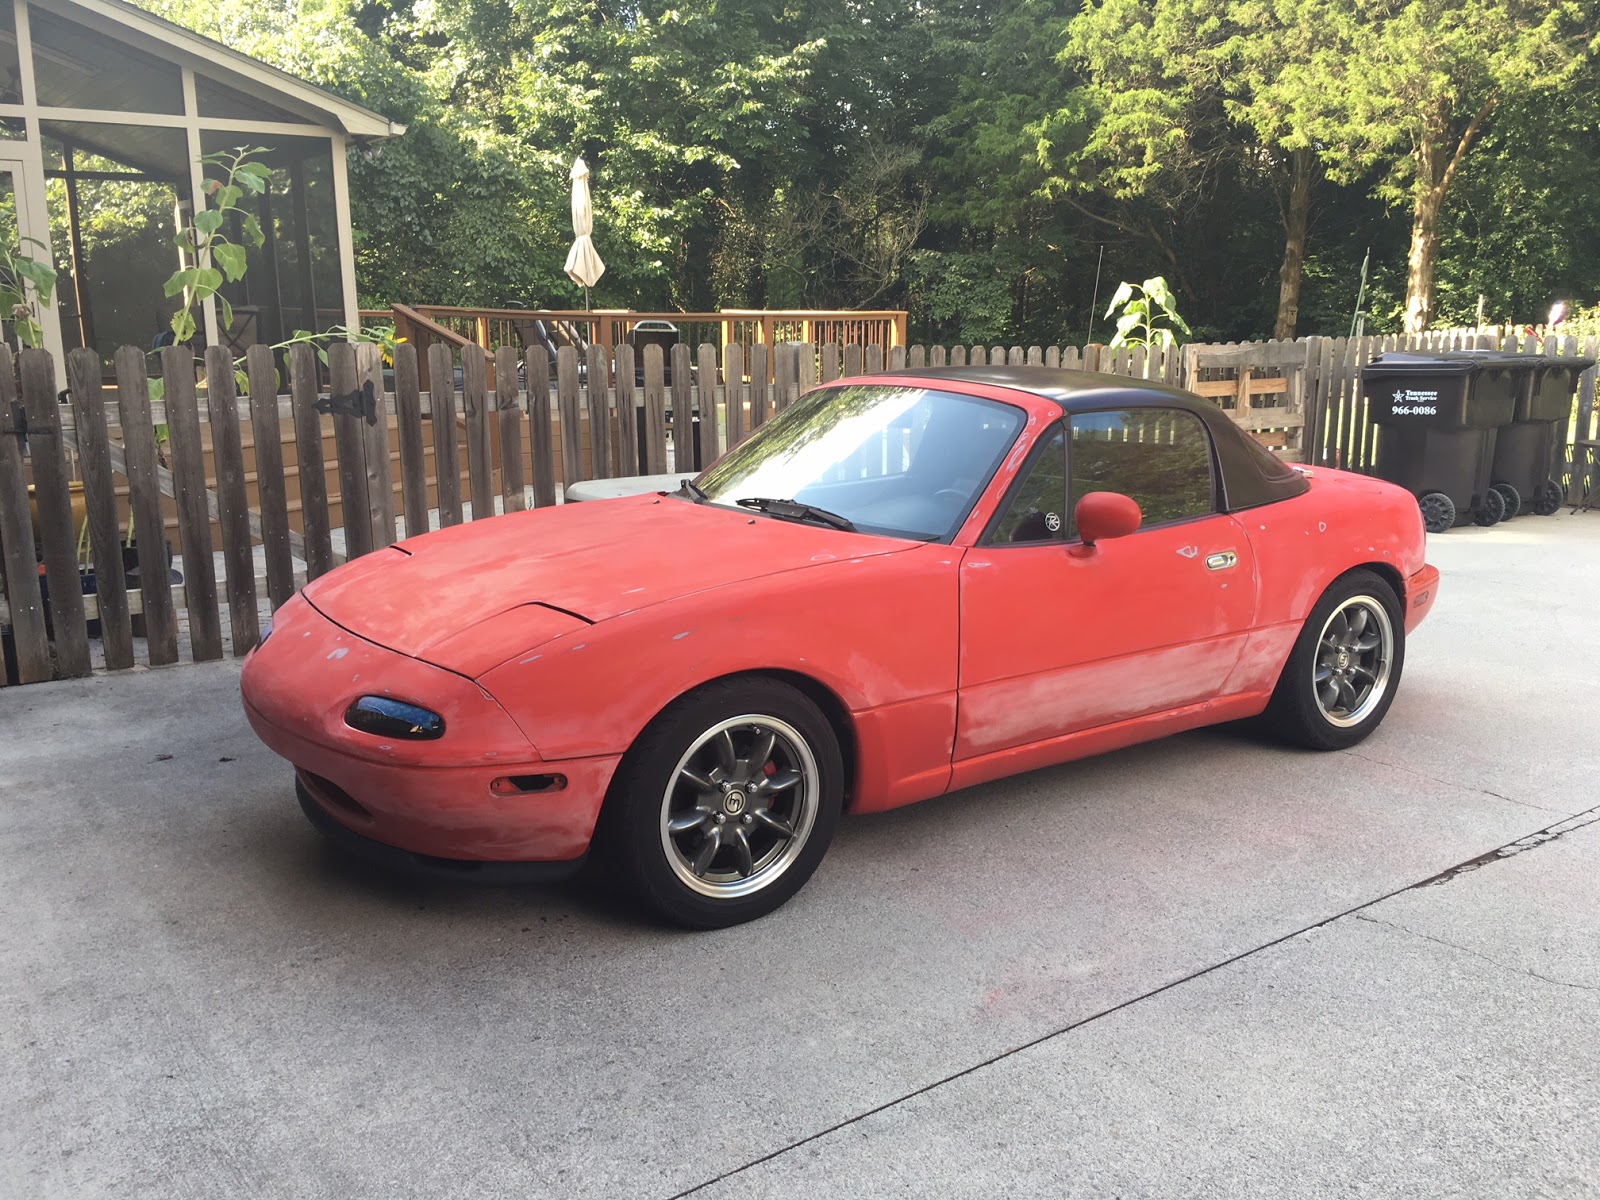
Hello! Yes, I'm still alive. The long-awaited day has finally arrived. I just dropped the Miata off at my local Maaco paint shop for a full repaint. I'm changing the color to Dodge's Destroyer Grey. I had wanted to paint it an old Porsche color - Slate Grey, but it turns out that color is hard to come by in modern paints. The shop tried very hard to cross reference the old Porsche paint code to something they could mix up, but to no avail. I'm sure a real Porsche restoration shop can do it, but Maaco can't. So this Destroyer Grey seems to be pretty close, if perhaps a bit darker, which is fine with me. I really just wanted it grey, and I wanted the car to not look terrible anymore. I did a ton of prep work myself, which may or may not pay dividends. It's not paint-ready, so the shop is still going to do some sanding and prep on it, but I got all the old dead clear coat off and most of the color coat. I also removed as much of the trim as I could - all the window moldings, beltline molding, side marker lights, and most of the interior. I'll post an update when the car comes home. I'll have a good bit of reassembly to do, but that's easy stuff. Then it needs new tires and probably a suspension refresh.
Thursday, August 02, 2018

Back At It (Miata Paint)

Slowly but surely I'm making progress in preparing the Miata for paint. I could just drop it off at a paint shop and pay them to do everything, but to ensure that the job is as good as it can be, for the amount that I'm willing to spend, it's best if I do as much of the prep as possible.
So I'm sanding all the old dead clearcoat off. First I'm sanding with 220 grit, and then I'll go back and do a quick pass with 400 grit. Anything else it needs I'll have the paint shop do.
It's a slow and tedious process and I only have a couple hours per week to spend on it. Updates as I get closer to being done.

Sunday, June 25, 2017

I Have a Confession to Make - 94 Miata Paint

I have this thing that's eating away at me. It's been happening for about a year now. I don't advertise it although it's not a secret; but it's time I do something about it.

The paint on my '94 Miata has failed. The clear coat just fell off. If you look back in this blog to the end of 2011 you'll see I did this paint job myself in my garage. It turned out ok. Not great but ok. For the $500 I spent on it, it was fine. I started to see the first indications of a problem in late 2015, just as we moved from Tampa to Knoxville. There was a single small bubble in the clear coat on the hood. It was the size of a pin head but I knew what it meant. Once in Knoxville, the car had to be parked outside. The damage unfolded quickly from there. By spring of 2016 the car still looked ok from 10 feet away, but the de-lamination of the clear coat was progressing apace. By the spring of 2017 the destruction was pretty much complete. So, my DIY budget paint job lasted between 4 and 5 years. I'm fine with that. I didn't take care of the paint and I didn't expect it to last forever. It was a stopgap measure from the start.

So, a paint job is forthcoming. I will not be doing it myself. I also have a place to store the car indoors now, so once this is fixed the issue should not come back.

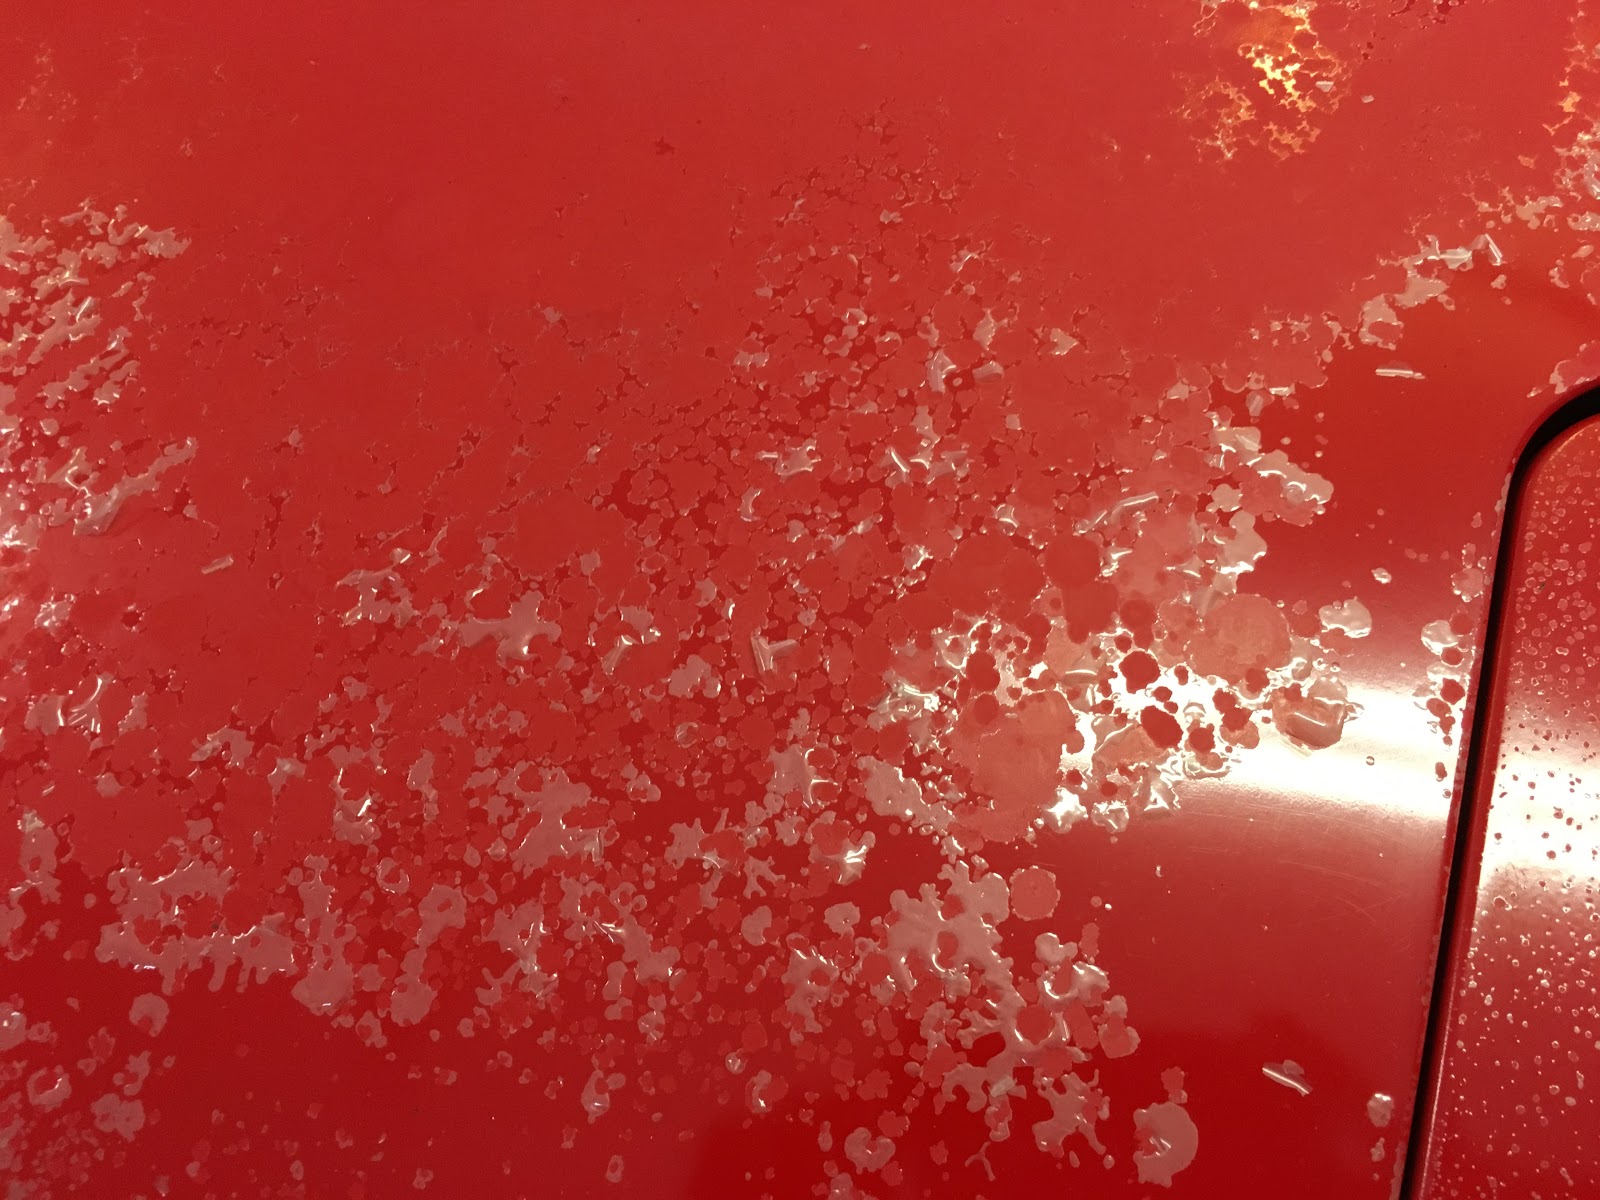
Large areas of the clear coat are completely gone. I've been encouraging it to come off by pressure-washing every few weeks to remove loose paint. I figure the more I can get off, the less work the paint shop will have to do.
While I'm at it, I'm going to install this RSpeed officially-licensed Garage Vary style trunk spoiler.

Here I've just stuck it on with some painter's tape so I could see what it looked like. I also have some small fender flares from Rev9. I don't have a photo of those so you'll have to wait until they're painted and installed. I'm still debating on color. I'd like to restore the car to the original color, but at the same time I'd also like to do something different. Tough life decisions...

More soon...

Tuesday, November 20, 2012

Jeep Cherokee XJ - Rusty Floors, Bedliner and Interior Recolor

So I finished pulling the nasty carpet out of the XJ the other day. The driver side floor is perfect, but darned if I didn't find a bunch of rust on the passenger side. The carpet went straight in the trash. I'd never reuse it. It was really nasty.
The rust went all the way through the metal in a few small places. It was not so bad that I needed to replace the whole floor pan, so I went to Home Depot and bought a few small pieces of sheet metal, trimmed them to size to cover the holes, and riveted them in place.
Here's the floor with the metal patches riveted in over an initial coat of Chassis Saver paint (POR-15 is a similar product).
I spent a couple hours with a wire brush on my die grinder and then slathered on another thick coat of Chassis Saver paint all over the floor and right over the patches I riveted in. It should neutralize the rust and keep it from progressing.
I then covered the whole floor with Desert Tan Monstaliner (truck bed floor liner) and it looks pretty good. It took an entire gallon to do the whole vehicle.
I used Duplicolor plastic and vinyl paint to recolor the interior from gray to black. It worked pretty well. In this photo you can see the original gray color on the door panel.
The fabric soaks up a LOT of paint and it leaves it feeling a little crispy, but overall it looks ok. I did the seats as well and the color has held up for a while now. It might need to be re-done every year or two if you sit on them a lot.

Sunday, January 08, 2012

Camshaft Fix and Finished Paint.

This weekend I swapped out the incorrect BP06 exhaust camshaft for the BP4W. The engine runs SO much quieter now. It virtually purrs. I'm very glad to get this sorted out because I thought for a short time that the engine overhaul had been a failure.
I can't express how good it makes me feel to not have those noisy hydraulic lifters anymore. They are a real scourge upon the owners of '90-'97 Miatas. Some cars never have a problem with them, but mine were noisy and getting worse for years.
I finished wet sanding with 1500 and 2000 grit paper, and then cut with Griot's Garage #1 polish, followed by their #2 polish and show car wax.
There are flaws in the paint, but it's still 99% better than it was and I only spent about $500 on the paint job. I like the color better than the original Mazda Classic Red. As long as it stands up over time, this is a win.

Sunday, December 18, 2011

Refurb Results!

The car is pretty much done! I'm just taking care of details at this point. I still have to wet sand and polish the whole car to correct some flaws in the paint. I'll try to document that as I go. I'm also going to revisit the valve adjustment. The car runs like a scalded cat, but the valves are noisier than I think they should be. I just want to check it again and try to get the clearances down to the bottom half of the specs. This is the downside of getting rid of the Hydraulic Lash Adjusters from the '94 head.
 
Here's the car on its first outing! The hood is still unpolished after wet sanding but you can't see it too much in this picture. The Reptile Red paint really pops in the sunlight. It's insanely red!
The engine money-shot.
This shot shows the color in more normal lighting.
I replaced the instrument lighting with LEDs. This doesn't make a huge difference except the needles are now white instead of green.
This came in the brown truck the other day.
It replaced the 12 year old MOMO Champion that was getting quite ratty. I love the red stitching and will probably mimic that on the seat upholstery when I do that.

Saturday, December 10, 2011

Painting Miata, Part 4

So here's the end of the first day of painting. I got three coats on the car. The first coat looked like crap because I hadn't got my technique down yet. The second coat made things a lot better and the paint was starting to flow out better and look glossy. After the second coat I sanded down some small nibs with 600 grit wet sandpaper and cleaned the gun before spraying a third coat. I didn't get the sprayer adjusted just right after I put it back together and it was putting down a lot more paint than before. I got greedy, because it was flowing out so nicely and looking really good, and I ended up with a few small sags that I will have to go back and fix.
 
The hood is really hard because it's difficult to reach all the way to the middle and keep the gun at a constant angle and velocity.
This is the paint. It's called Reptile Red and it's a bit brighter than the Mazda Classic Red, but definitely in the same family. It's a 3:1 mix so they sell you 3/4 of a gallon and then you add 1/4 of the activator. If you were going to spray the whole gallon all at once you could just dump the activator in the can with the paint and go. Once you do that, though, you only have about 2 hours until it starts to gel.
Next I have to fix the sags and then I can spray clear. It still looks kinda "raw" and probably won't all come together until the clear is on and cured and I can really give it a good buffing with the random orbit polisher.

Sunday, December 04, 2011

Painting Miata, Part 3

This weekend I started spraying paint. Since the car is mostly stripped down, the job of masking is pretty minimal. This photo shows the car more or less ready to shoot with primer.
Safety first! Painting involves some pretty nasty solvents and particulates in the air. Proper protection of lungs and skin is essential.
This is as far as I got the first day. I was having trouble with my HVLP spray gun and decided to stop and make a couple improvements to my air system. I installed a bigger air regulator and a new inline filter. It seemed to do the trick once I learned how to set the gun up right and I got much better results.
Primer before sanding.
Parts.
So this is where I left off tonight. The primer is all sprayed and I've gone over the whole car with 400 grit dry paper. Before next weekend I have to wet sand the whole car with 600 grit and then I'll be ready to spray color and clear.

Saturday, November 26, 2011

Painting a Miata, part 2

The paint prep continues. The entire car has been sanded with 400-grit and some small dings on the passenger side filled. I also filled the hole in the trunk from the spoiler mount, and the two holes in the nose from the emblem. I plan to leave the emblem off.
Next weekend I'm going to give it another going-over just to make sure the surface is fully scuffed and everything is smooth, and then I'll be ready to spray the urethane primer. I figure a whole day to mask it and spray the first coat of primer. I'll be doing the door sills as well.
This dent was very wavy and very hard to fill in. It had low spots as well as high spots. It will probably be visible once the paint is on but I don't think anyone will notice it unless I point it out. It feels pretty smooth when you run your hand over it, but it is detectable.

Sunday, November 13, 2011

Painting a Miata, part 1

I started sanding the body today. I'm using sanding pads with 400 grit dry sandpaper. Once I hit the paint with sandpaper I passed the point of no return. I have to paint this car now!
I do plan to remove the door handles, by the way.
This panel has two real nice little dents in it. They happened years ago and I've neglected to do anything about it. I'm very happy to get these fixed. Here they are after I sanded them down to bare metal so the body filler will stick.
I got this stuff from Eastwood. It comes with a tube of hardener. You mix the hardener in at a 2% proportion. After that you have about 3 minutes to get it in place. Forget about making it pretty and smooth. Just get it on there and 15 minutes later you can sand it down smooth.
It took 3 applications to build the material up high enough that I could sand it down level. Interesting how each dent had high spots surrounding it. It's level now as I can't feel any deviation at all when I run my hand over the filler. The primer-filler and paint coats should make it disappear completely.
This was as far as I got today. I did the driver door, left rear quarter, and the trunk lid. Next weekend I'll continue around the rest of the car, then probably go over it again completely before I spray primer-filler. I'm wiping down between sanding passes with a product called Pre to keep the dust down and hopefully avoid any contamination that would create fisheyes or pinholes. We shall see if it works.