Sunday, June 25, 2017

I Have a Confession to Make - 94 Miata Paint

I have this thing that's eating away at me. It's been happening for about a year now. I don't advertise it although it's not a secret; but it's time I do something about it.

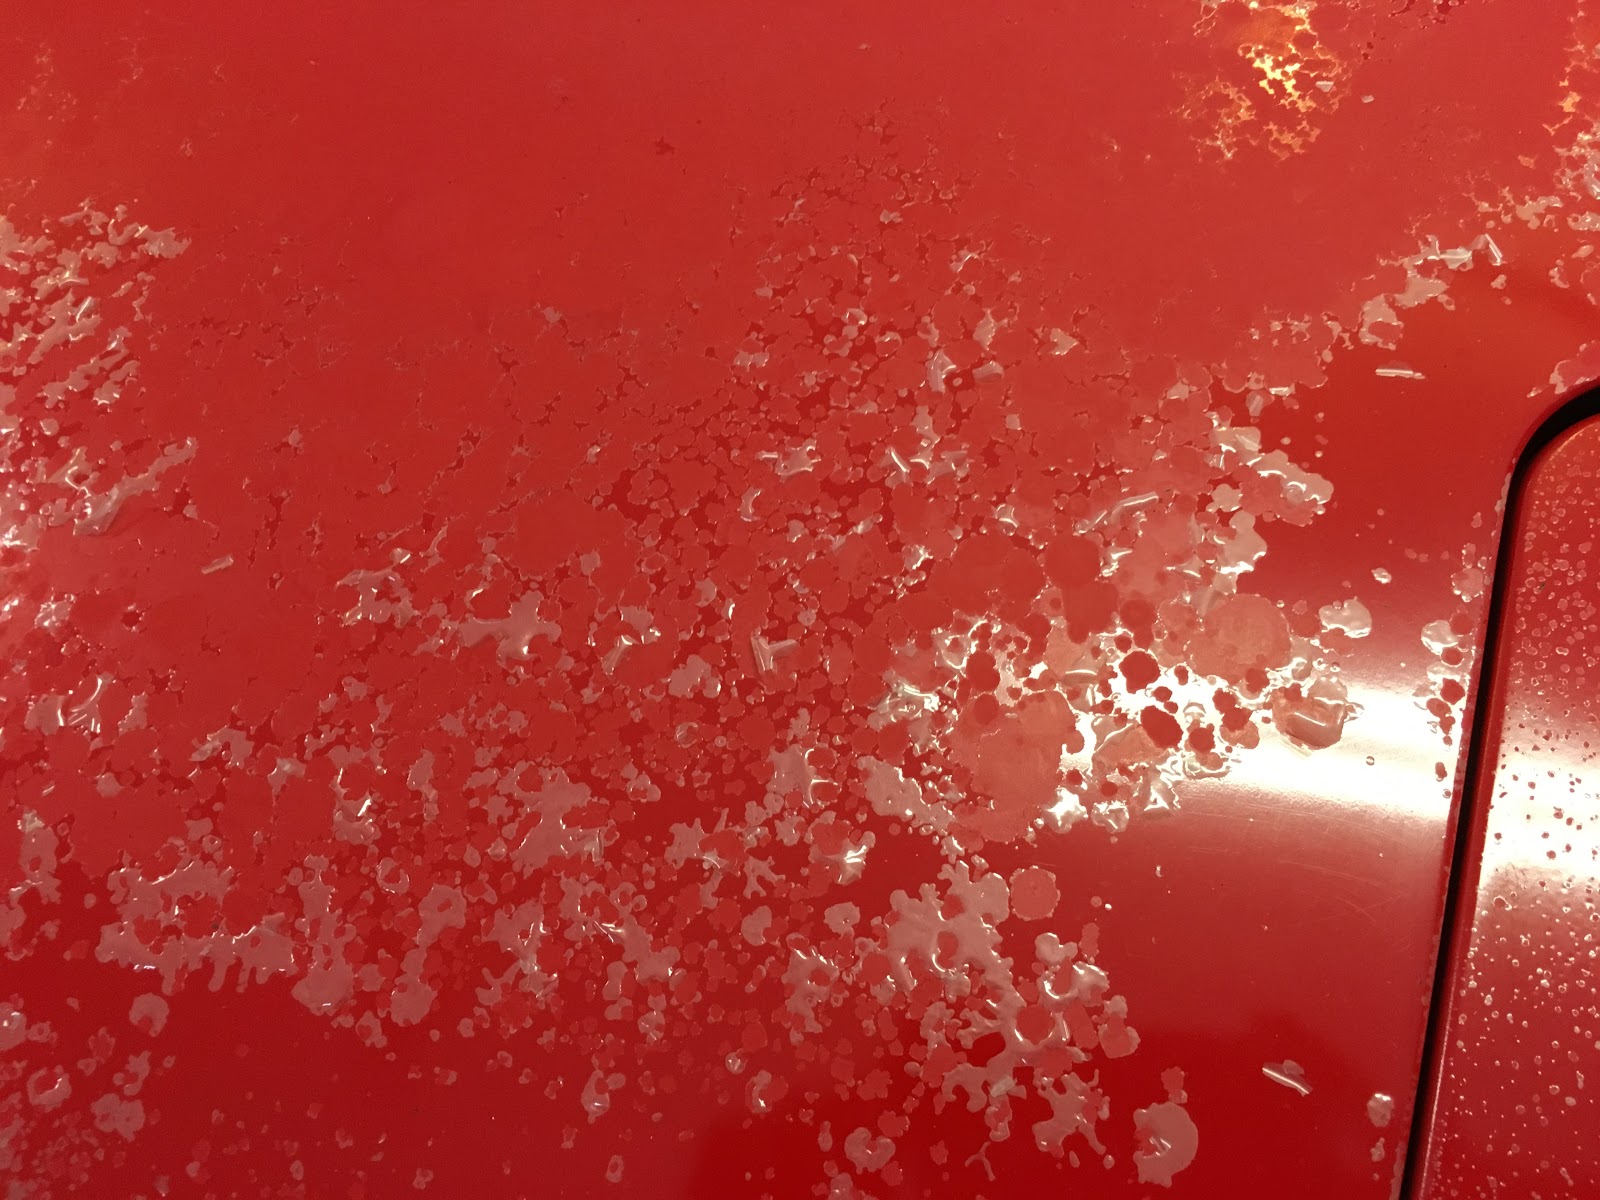
The paint on my '94 Miata has failed. The clear coat just fell off. If you look back in this blog to the end of 2011 you'll see I did this paint job myself in my garage. It turned out ok. Not great but ok. For the $500 I spent on it, it was fine. I started to see the first indications of a problem in late 2015, just as we moved from Tampa to Knoxville. There was a single small bubble in the clear coat on the hood. It was the size of a pin head but I knew what it meant. Once in Knoxville, the car had to be parked outside. The damage unfolded quickly from there. By spring of 2016 the car still looked ok from 10 feet away, but the de-lamination of the clear coat was progressing apace. By the spring of 2017 the destruction was pretty much complete. So, my DIY budget paint job lasted between 4 and 5 years. I'm fine with that. I didn't take care of the paint and I didn't expect it to last forever. It was a stopgap measure from the start.

So, a paint job is forthcoming. I will not be doing it myself. I also have a place to store the car indoors now, so once this is fixed the issue should not come back.

Large areas of the clear coat are completely gone. I've been encouraging it to come off by pressure-washing every few weeks to remove loose paint. I figure the more I can get off, the less work the paint shop will have to do.
While I'm at it, I'm going to install this RSpeed officially-licensed Garage Vary style trunk spoiler.

Here I've just stuck it on with some painter's tape so I could see what it looked like. I also have some small fender flares from Rev9. I don't have a photo of those so you'll have to wait until they're painted and installed. I'm still debating on color. I'd like to restore the car to the original color, but at the same time I'd also like to do something different. Tough life decisions...

More soon...

Friday, June 16, 2017

Recovering 1994 Miata Seats

As usual, I failed to take a logical progression of photos during this job, but I did get a few and will include them here. It should give a flavor of what's involved in recovering the Miata seats. I've had slip-on covers on the original seats for several years now but was never happy with how they fit. So, real upholstery was called for. I bought these covers on Amazon for under $150. For that price, even if they don't hold up, I'm not out much. Except for about 8 hours of labor, of course.

The hardest part of the whole operation is getting the old covers off the foam cushions. There are a ton of hog rings that you have to cut. My pair of dykes was barely up to the task. It takes a ton of hand strength to cut them. If you do this job, do yourself a favor and get a nice new pair of really big dykes. By the end of the second seat, my hands were worn out and my dykes were dull so I could barely cut the rings anymore. I ended up cutting a bunch of them with a Dremel tool.
The seat back is in two major pieces. Pay attention to how they come apart so you'll know how they go back together. It's not entirely obvious. The center piece is held in by the upholstery itself.
There. That sort of shows it.
The old foam is in really sad shape, but new foam was not in the cards. It's either unavailable or really expensive. I used gorilla tape and some polyester batting to shore up the side bolsters.
The other problem with the foam is that there are metal rods on either side of the main center seat cushion that were pulling out of the foam. These rods are what the hog rings loop around and give the seat its upholstered shape. I fixed it using some 16-gauge aluminum wire...
...pushed through the foam over the rod...
...and secured on the underside with a wooden dowel (chopstick). This gives the new hog rings something to pull against, rather than just rip out of the foam.
The seat pans were also really rusty. Some Rustoleum gray primer fixed them right up.
Fully restored seat pan. I also cleaned and lubed the sliders.
Wrapping the underside of the seat-back is a bit tricky. Lots of stretching required. I did a lot better on the second one than the first.
Finished product. I'm pretty happy with how these turned out.
No doubt the vinyl will be quite hot in the heat of the summer, but it's worth it for seats that aren't absolutely gross. This project breathed a lot of new life into this car.

One final note - I used a lot of zip ties instead of hog rings. In many cases, it was a lot easier to get a zip tie in place. In some cases the hog ring worked better, though, so be prepared to use both.

Thursday, June 08, 2017

1994 Miata Original Radio Goodness

Still working on getting the interior in order, I did a little work on the center stack. I had previously hacked up the 'tombstone' to install a double-din stereo out of a 2002 Protege. It fit but I had to widen the opening just a bit. After that stereo died I put the original stereo back in, but after 15 years I had lost the cubby hole and the hacked up plastic looked pretty bad. So, I installed a brand-new 'tombstone' and a blank panel under the radio where the cubby was.
The part number for this blank panel is NA01-55-231. Now that I have the fancy gauge faces (previous post) I feel like the A/C controls need a little help. Gotta think about that.