Wednesday, December 21, 2016

Used Oil Handling in the Home Garage

I'm not someone who pays others to do what I can do myself, so I do most of my own work on my cars. That includes oil changes. I use high quality synthetic oil like Amsoil in all three of our cars, so really only need to change the oil once or twice per year, but since the Cayman holds almost two gallons of oil, it adds up to a lot of used oil that I have to deal with. I have a 5-gallon jerry can that can store a year's worth of used oil, but it's a pain to take it to drop off because it gets so heavy and if it fell over in the car it would probably leak considerably. Our county waste center is also more geared towards dropping off containers without regard to getting them back. Finally, my time is very limited and valuable, so any solution that involves scrounging for containers, transferring waste into small containers, or taking oil around to auto parts stores is a non-starter.

So, I've been thinking about a more effective way to deal with used oil. In any Process Improvement initiative, I always try to come up with concrete requirements so that I can design a solution that addresses all of them.
For this solution, I have the following requirements:
  • 1) I want to take the oil to the county waste collection point and drop off without having to worry about getting my container back.
  • 2) I want to safely store used oil at the house without fear of leakage.
  • 3) I don't want to transfer oil into small containers.
  • 4) I only want to transfer the oil once.
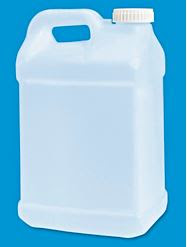
Photo by Uline.com
The solution: 2.5 gallon plastic jugs. (Incidentally I have purchased from uline.com in the past and they are great.) They cost almost $6 each but I'll only need about two per year, adding $12 to the cost of my annual oil changes. In the scheme of things, this is a drop in the bucket and I'm still saving far more than that by not paying a shop to do my oil changes. I should also note that when I had a cat, I used the empty kitty litter containers for exactly this purpose, and they were pretty much the same sort of container. They worked great! Let me hear your ideas for dealing with used oil and other waste products in the home garage. UPDATE: Since the jugs at ULINE can only be ordered in case quantities, and I don't want 12 of these things hanging around, I found a vendor on Amazon that sells four 2.5 gallon jugs for $35. One jug holds a couple oil changes (one for the Porsche) and keeps things tidy. Win!!

Monday, October 10, 2016

Cayman S on Cherohala Skyway and Tail of the Dragon

The Cherohala Skyway snakes through the southern end of the Smoky Mountains in Tennessee and North Carolina. It links the towns of Tellico Plains and Robbinsville, with not much in between except sweeping vistas and sinewy roads. Bear country.
The Porsche Cayman S is in its element in this environment. It is perfectly adapted to this road. Its razor-sharp handling and prodigious power make for a very entertaining drive. With an almost telepathic responsiveness, the driver's confidence rises, speeds increase, and one has to make a conscious effort to slow down in order to avoid "consequences".
But the Cayman delivers almost as much pleasure when sitting still as it does carving curves. Its lines are so clean, so perfect. It's a car without too many extras. Not too much to distract from its purpose. There is no infotainment system. There are modern conveniences but they don't coddle you. The feel is somewhat raw without being punishing. Playful but a little serious. Not like a Miata, but not quite an M3 either. Just right.

After the drive is over the sounds of the flat six still resonate in your head. The feel of the wheel in your hands persists. You wash off the road dust and prepare for the next time. The next time you can head back to bear country with your Porsche.

Photo by Killboy.com

Tuesday, September 27, 2016

A New Obsession - Porsche Cayman S

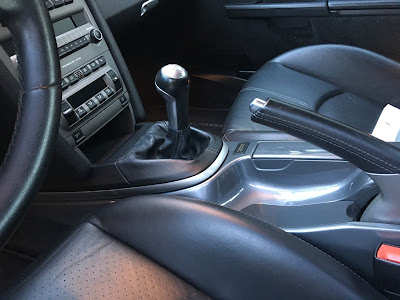
Here at Morrison's Garage things don't change very often. I tend to keep my cars a very long time. So this was a big deal. The M3 is gone and this 2006 Porsche Cayman S takes its place. I don't have good photos so these iPhone pics will have to do for now. The color is Seal Gray over black leather. It has sport seats, sport shifter, sport steering wheel, body color center console and seat backs, 19 inch Carerra classic wheels and a Milltek exhaust and headers. Only 40k miles and it's obvious this car has been babied. Much more to come!

Wednesday, April 20, 2016

Miata in East Tennessee

Today I went for a drive down the Foothills Parkway, across the Tail of the Dragon, and back again. This is the most I've driven the car since the engine rebuild and it performed flawlessly.

Tuesday, April 19, 2016

E46 M3 Suspension Refresh

At 136000 miles, my M3's suspension was tired. Beyond tired. The ride of the M3 should be taut, well controlled, and confidence-inspiring. Mine was loose, uncontrolled, and decidedly un-inspiring. I have a new commute for work starting soon, so I decided to get some work done. I'd really like to go through the whole suspension and replace all the bushings but the most pressing issue was the shocks and struts. The OEM suspension on the E46 M3 consists of non-adjustable shocks (rear) and struts (front) made by Sachs. They are very high quality and well suited to the M3 in street form. For my upgrade, though, I decided to go with Koni Sport adjustable shocks and struts. They're very affordable (cheaper than the Sachs) and have been the go-to adjustable shock in sporty-car circles for decades. I have no desire to lower this car, and don't see myself tracking or autocrossing it any time soon. I will be taking it for many spirited drives in the mountains, since the legendary roads of the East Tennessee and Western North Carolina mountains are just a few miles away. So, I figured the Koni's and stock springs offer the best combination of sporting character and affordability. I ordered them from ECS Tuning on a 20% off sale and got them within a couple days.
I also ordered new top strut mounts and reinforcement plates. The plates are an OEM BMW part that is meant to prevent deformation of the strut towers. Mine were showing no signs of any issues so I guess I didn't need them but I suppose they can't hurt.
Getting the strut out is pretty straightforward. You disconnect the swaybar link, remove the bottom clamp bolt and wiggle the strut out of the spindle. Mine were quite stuck and I had to use a drift and a rubber mallet to strike the top of the hub and work the bottom of the strut out. Then you remove the three top mount nuts and the whole strut will fall out. The original strut, once out, is disassembled using spring compressors so the springs and a couple washers can be reused.
Assembling the strut with the Koni shock requires a little ingenuity. The top of the shaft is 11mm hex, which you have to hold in order to keep the shaft from spinning while you tighten the top nut. You can see how I solved the issue with a 1/4" extension and a spark plug socket with flats that allow the use of a wrench.
Once the strut is assembled, getting it back in is quite tricky. It's a Chinese puzzle and nothing I write here will help you.
The rear shocks are easy to get out and easy to assemble. The Koni rear shocks have a 5mm hex socket on the head which you can hold with just an allen wrench while you tighten the top nut with an open wrench. I had to reuse the bump stops because I neglected to order new ones. They look bad but seem to be serviceable. I used new top mounts and also bought the ECS rear shock mount reinforcement plates.
Installation is super simple. One bolt on the spindle and two nuts in the trunk.
The top mount with the reinforcement plate. There was no apparent issue so I probably didn't need the plates, but they're cheap.

I tested the old shocks by compressing them by hand. They were very easy to compress and the rears would barely re-extend at all. The fronts were a little better but not much. The new shocks are set at full soft in the front and one turn up from full soft in the rear. This brings me to the one major drawback of the Koni sports. The rears can only be adjusted for rebound by removing them from the car! You have to compress them completely and then turn the shock body in relation to the shaft. The fronts have a knob on the top for the adjustment, so no big deal to make changes to fine-tune the ride, but if you are an autocrosser or track star and think you may want to make frequent adjustments you might want to look for another solution.

Wednesday, April 06, 2016

M3 at the Tail of the Dragon

Just a little eye candy from a recent drive through Deal's Gap. I purchased a few photos from the photographers that make their living snapping pics of people having a blast on the Dragon.

Miata Front Shock Upper Mounts are Done

Here's how to recognize when your upper shock mounts are shot. This one is from my 1994 Miata with 175,000 miles.
The old mount is on the left and a brand new one on the right. If the center part of your mounts are popped up like this one, it's time for new ones. Both front mounts on my car were like this. The result was a rattly, loose front suspension that made my car feel like a piece of junk. The cost of replacements were under $100 for both from Flyin' Miata. I was planning to replace the entire suspension when I realized the only problem was these mounts.

The Tein Basic coilovers I installed in 2004 still have some life in them.

Sunday, March 13, 2016

94 Miata Engine Rebuild - Part 4

Time to finish up the story of my engine rebuild in the 1994 Miata. The first part of this is here, here is part two and part three. The images that follow are roughly in chronological order, but not exactly. I'll just briefly explain each photo so you'll know sort of what's going on. My purpose here is just to let you know what you're in for if you're doing this, not explain exactly how to do it.


Once the pistons were all assembled and installed, and the rod bearings installed and torqued down, it was time to build the motor up. Here you can see the tops of the '01+ pistons. If you were to compare to the '94 pistons you'd see these are a bit more domed on the top, which is what provides the additional compression. You can also see where they are marked as oversize with the 0.50 stamp (upside-down in this image).

The next step is to plop the cylinder head back on the short block. I didn't get a photo of the head gasket installed but there's nothing tricky about it other than to make sure you don't block the oil feed to the head. There's only one correct orientation for the head gasket. I didn't disassemble the head for this rebuild since it was just refreshed about 25k miles ago.

Next the intake manifold goes back on.

This photo shows the VICS butterflies in the '99 intake manifold. You can see by default they are open. I don't have a way to control these yet so for now I opted to wire them shut. Even though I don't get the (admittedly miniscule) benefit of VICS, the '99 head still flows tons better than the '94 head and also has the solid valve lifters that are much less problematic than the HLAs of the '94.

Next I assembled the crank nose with the timing belt cog and a new key. You can also see the new oil pump I installed and some of the sealant spooging out from the front of the oil pan. I had to trim away this excess sealant as it interfered with the pulley boss a bit later.

This photo shows the orientation of the fuel pressure regulator and the new fuel hose connector to mate the '94 fuel system with the '99 fuel rail. This is discussed in great detail in an earlier blog post but since I got this better photo I wanted to include it.

Keep building. Here the timing belt and water pump is installed, also the throttle body, thermostat, some coolant hoses, and the A/C belt idler (my car has no power steering pump).

Close-up of the belt idler for the A/C belt. Cars with power steering will have a power steering pump here.

The front of the engine is pretty much fully dressed. The alternator is in place, the water pump pulley, and crank pulley.

Motor mounts are next. I went back to the standard mount after having Mazda Competition motor mounts for a few years. I didn't like the extra harshness I felt while driving with the competition mounts. If this was a track car it would be different.

Next I bolted on the flywheel, clutch, and pressure plate. I didn't get any photos of it! I used my trusty Flyin' Miata crank nose tool to lock everything in place while torquing things down. You can see I substituted some grade 10.9 cap head bolts for the original bolts here. No reason to do that if your old bolts are in fine shape.

Next is to mate the engine and transmission. This is much easier to do on the floor of the shop than under the car. I used the crane and the transmission jack to maneuver them in place, then just let the bolts do the work. Now it's time to fly the engine into the car.

This part was a lot harder than it looks. A helper would be very..uh...helpful right here. I was wishing for a bigger crane because this one couldn't quite reach far enough. Note I have a leveler. This is crucial for getting the whole assembly oriented and dropped in place. You have to work in fractions of inches while constantly making adjustments to the attitude of the assembly. Once the motor mounts engage with the holes in the subframe you are home free. Don't forget to reengage the driveshaft with the tail of the transmission as you move it back or you will have to do like I did and unbolt the driveshaft from the differential so you can plug the nose back into the transmission. No big deal but an unnecessary step if you think ahead.

Finally when the engine is bolted in you can start hooking everything back up. The exhaust manifold, hoses, wiring harness, radiator, A/C compressor. Everything you had to unhook before. Refill the transmission with gear lube. You'll probably forget something and wonder why the car won't start. Just be methodical and it will work out. Don't take shortcuts and don't skimp on parts or tools.

Now that this is done I'm very happy with the engine. It definitely has a lot more power than before, and runs smooth as butter. Now I have to bring the rest of the car up to the standards of this motor. It never ends. Hope you enjoyed this series of posts. Sorry they were so far between.