
Tuesday, September 17, 2013
Gorilla Garage Tampa Octoberfest
The first annual GGT Octoberfest is on for October 13, 2013. We'll have our project cars on hand, along with some brews, cooked meat products, and plenty of bench racing.

Monday, April 29, 2013
Gorilla Garage
So it's been a long time since I've posted. Life has been busy and I've not had a lot of time to do car stuff, and even less to write blog posts. Nevertheless, there is news afoot in Morrison's Garage. We've moved into an actual garage; namely, Gorilla Garage Tampa. Formerly the site of the Gorilla Theatre (the name kinda stuck) and housed within the walls of a nondescript warehouse in the strip-club and industrial warehouse district of Tampa, the GGT is almost 3000 square feet of space, shared between myself and three other gearhead enthusiasts.
 | Panorama of the GGT showing a couple of the other residents' projects. |
|
| My M3 in for a rear brake job. |
 | It's nice working with a TON of space. I'm still working on getting my work area set up and sorting out which tools stay at the house and which go to GGT. |
 | A pic from up in the loft. My neighbor is a '61 Austin-Healey 3000 that is in show-winning condition. I think my cheap Jeep and Miata will feel a little inferior. |

My plans for the GGT include finishing the Cheap Jeep and possibly getting it ready to sell, sprucing up the BMW a bit and bringing it up to A+ condition, and maybe another engine project for the Miata. I'd also like to purchase and restore an older BMW or Porsche. More to come...
Tuesday, November 20, 2012
Jeep Cherokee XJ - Rusty Floors, Bedliner and Interior Recolor


Monday, October 29, 2012
Jeep Cherokee XJ update
Progress on the XJ has been slow. I've just not had the free time to work on it. I do have the engine running nicely now and it starts right up on the first try every time. Unless I disconnect the battery for any reason, that is. If battery power is interrupted for even one second, the ECU seems to completely lose its mind and the Jeep will barely start. Once it starts, it runs really rough for a few minutes, idles high, shifts hard, bogs on takeoff, and several other bad habits. This continues for a couple days and then everything is hunky-dory again. If anyone can tell me how to get around this, I'd love to learn about it. (Edit: I replaced the ECU and it fixed all the issues. Should have just done that first.)
 My next task is to strip out all the carpet and install Monstaliner throughout the inside of the truck. I got a kit in desert tan.
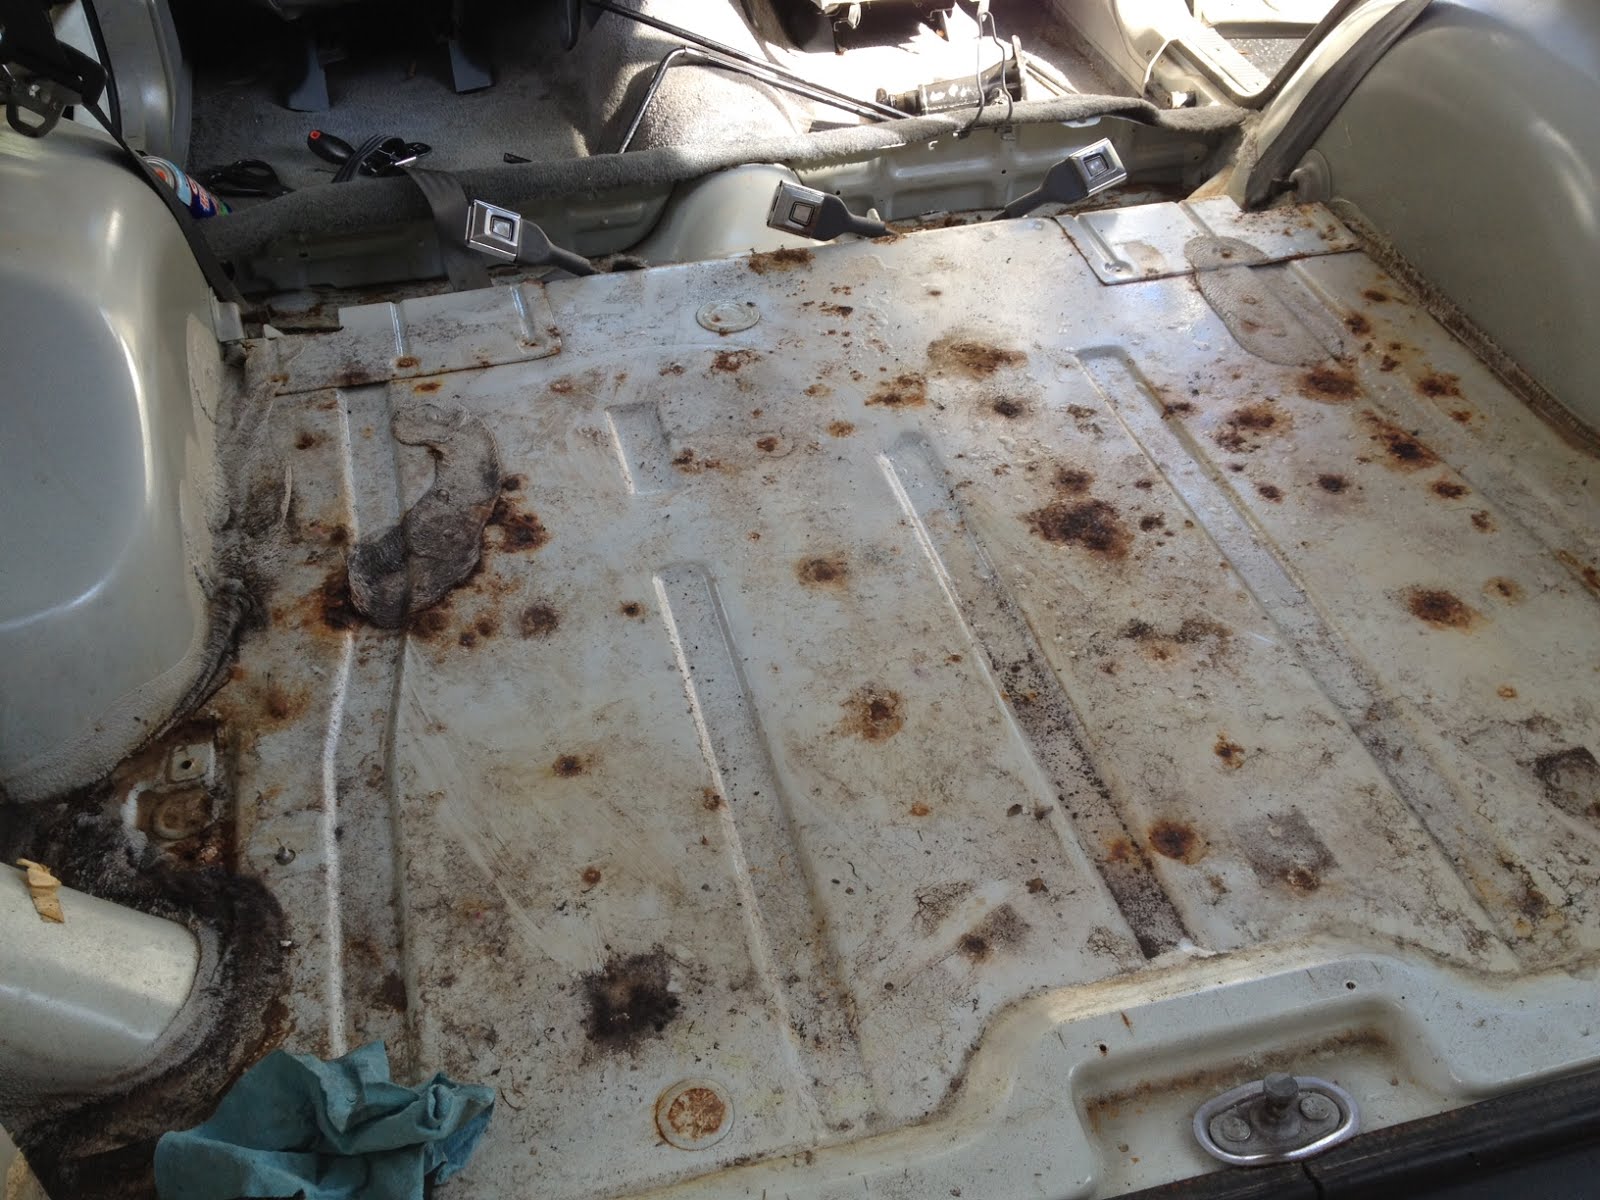
 Quite a bit of rust under the carpet! It was really nasty. Bugs living in it and everything. The rust is pretty minor, but I'll clean it up and stabilize it with some rust sealer before I put the Monstaliner over it.
 I used a wire brush on my angle grinder to clean up the rust and take off a lot of loose paint.
 Pretty much all the rust cleaned up. Next I have to pull out the front seats so I can get the rest of the carpet out.
Now I do have a few pictures for you.


The next post in this series is about the rusty floors.
Saturday, October 06, 2012
Something not car related - The Mud Endeavor


Saturday, September 15, 2012
$1500 Jeep Cherokee XJ Makeover, Stage 1
So for the last couple weeks I've been getting to know this '92 Jeep Cherokee. I've never had a Jeep before and I really don't know anything much about 4x4 vehicles in general. I've got a lot to learn. But first things first - this thing has 174,700 miles on it and needs some TLC.
 As usual I'm not terribly disciplined when it comes to taking pictures of my process. So this post is a bit random in nature. I've not done anything complicated or difficult, though, so there's not much to document. This pic shows the engine just after I started pressure washing it, which was the first thing I did. It improved the grime situation considerably, but there's still a lot of filthy areas I haven't got to yet.
 I installed an Amsoil EaA air filter in place of the old filter, which looked to be a K&N oiled gauze filter. The Amsoil will filter much better in potentially dusty environments. The same day I did this I also installed all new hoses and flushed the cooling system. I pulled off the valve cover and painted it and put it back with a new Felpro gasket because it was leaking badly and making a big mess of the engine. I also changed the oil and filter, using Amsoil ASL 5W-30 and an EaO filter.
 The instrument surround panel was silver and quite ratty looking. A few coats with some Duplicolor plastic/vinyl paint and it looks 100% better! I'll probably do a few other bits of the dash as well. Overall it's in decent shape. I got some LED's for the interior lights but they don't fit quite right. I'll have to modify the housings a bit. I also plan to strip the carpet and coat the floor with bedliner, recover the seats and redo the door panels with something less stodgy looking.
 The front brakes were almost down to the backing plates and the rotors quite scored. The first time I drove this Cherokee I was startled by how bad the brakes were. So a set of Bendix CT-3 pads and a pair of Centric rotors went on the front. It definitely has helped, but the brakes are still not great. I discovered a big bulge in the side of one of the brake hoses, which would definitely ruin the brake feel and limit performance, not to mention the obvious safety issue, so new brake hoses all around will be installed in the next week or so. I haven't even looked at the rear drum brakes yet. I'm sure they'll need attention.
 I drove the Jeep to work one day last week and my nose alerted me to a coolant leak. A quick inspection underneath revealed a leaking radiator. That explains why the cooling system had no antifreeze whatsoever in it - the previous owner had just been keeping it topped up with water. So a quick trip to NAPA yielded a new radiator for just over $100 and I installed it today.
 I also cleaned up and painted the radiator support bracket and the fan surrounds. I used Eastwood Chassis Black on the radiator support and it came out nice enough given the limited amount of prep I did on it.
 Also today I installed all new battery positive and negative cables that I got from a guy on the Jeep Forum. They're made with big 4 gauge wire and sized exactly to fit the XJ engine layout. I also threw in a new Optima Red Top battery to replace the pathetic Advance Auto "Economy" battery the XJ came to me with. Finally some gold plated terminals tie it all together and replace the old tired lead clamps that were original to the Jeep. They were so worn they would hardly tighten down on the posts anymore. I also installed a set of new 8mm silicone plug wires and a distributor rotor and cap from Summit Racing.
 Here's an external shot. I haven't really done anything to the exterior yet. After this photo was taken I yanked off the rubber moldings on the lower panels. I'm going to clean that area up and coat with a bedliner type material.


I took the XJ out for a 45 minute drive this evening and it's definitely running better than it was when I got it. I certainly can't trust the brakes yet, but they are better. The ignition system seems to be working nicely now as well. It's been a bit hard to start a few times, especially after sitting for a while, so I'm suspecting it may have some leaky injectors. The truck drives just fine. It just needs a whole new suspension. On smooth pavement it's fine, but on bumps or broken pavement it just comes completely unglued. I figure the shocks are long gone. I'll be installing a mild lift kit with new shocks before too long anyway, so it's not a problem.
Monday, August 27, 2012
New Toy - 1992 Jeep Cherokee XJ 4x4

Monday, July 09, 2012
Mystic Blue BMW M3
I got a few new snaps of the M3 this weekend. It has 113,000 miles on it now and it's perfect. It was an overcast day with the strong summer sun filtering through and it seemed to give the car a softer sheen.


Sunday, May 20, 2012
Mini, not MINI

Sunday, April 08, 2012
Randall Cowl Intake Installation on '94 Miata
Time for a little more work on the '94. Since I got the fuel issues sorted, it's been running great. So today I installed the Randall cowl intake. It's just a carbon fiber tube that connects the factory airbox to a hole in the firewall that ingests air from the cowl area where the air is nice and cool. I bought it from Flyin' Miata and it's one of the few aftermarket intakes that actually shows a horsepower gain on the dyno. I didn't get it for the horsepower, exactly. Mainly it was just because my stock intake tube was cracked and I figured while I was replacing a part I might as well get something that could somehow be considered an upgrade. In other words, because racecar.
 The tube.
 The intake comes with a template, because you have to cut a hole in the firewall. You also have to bend the clutch hard line a little bit to get it out of the way.
 Possibly the most imprecise cutting tool on earth, but it got the job done.
 Two holes. Sorry for fingers in photo!
 With Dremel tool, make one hole.
 Touch up with paint.
 Cram carbon fiber tube into place.
 I found it best to loosen the airbox from its mounts to make it easier to snap the Randall onto the flange.


Driving impression: so far so good. There's a little more intake noise and my highly calibrated butt can detect a little more responsive throttle. Nothing dramatic, obviously. It's a tube.
Subscribe to:
Posts (Atom)